Crochet fingerless gloves are useful when you want a warm layer around your wrists and palms while keeping your fingertips free. This pair uses two flat ribbed rectangles, one for each hand. You fold each rectangle into a tube and sew the side seam in two sections, leaving a gap for the thumb. There are no separate fingers, thumb gussets, or shaped cuffs to work.
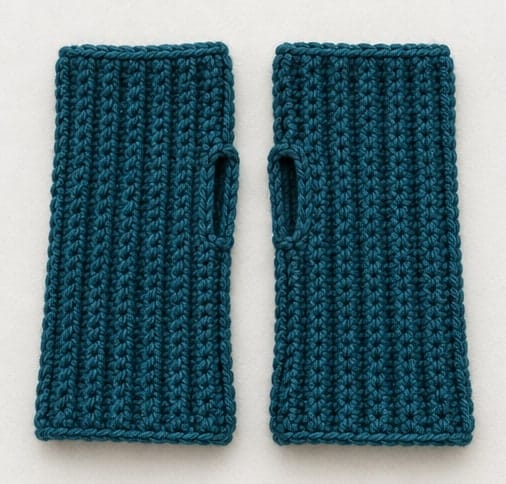
The pattern uses US crochet terms and makes straight-sided mitts approximately 7 inches long and 7¼ inches around at the stated gauge. The sample begins with 28 stitches and uses 36 rows per rectangle. Those counts are a starting size, not a substitute for measuring your hands. You will check the fit before sewing and can move the thumb opening to suit your proportions. For a coordinated winter set, pair the mitts with this crochet ear warmer pattern, which also uses back-loop single crochet.
Project at a Glance
| Detail | Pattern information |
|---|---|
| Skill level | Beginner comfortable with single crochet and simple sewing |
| Crochet terms | US terminology |
| Construction | Two rectangles folded into tubes with thumb gaps |
| Yarn | Smooth worsted-weight wool blend or another soft, resilient yarn |
| Hook | 5 mm starting size; adjust after swatching |
| Main stitch | Single crochet in back loops only |
| Target gauge | 16 stitches and 20 rows per 4 inches, washed and relaxed |
| Sample rectangle | 7 inches by approximately 7¼ inches |
| Finished mitt | About 7 inches long and 7¼ inches in circumference |
| Sample thumb opening | 1½ inches along the side seam |
| Estimated yarn | 120–170 yards for the pair, plus a swatch allowance |
Materials and Gauge
Select yarn that feels comfortable on the inside of your wrist. This area can be more sensitive than the back of your hand, so rub a strand against it before choosing a scratchy wool. A smooth, light- or medium-colored yarn makes it easier to count stitches and identify the back loops. Highly fuzzy or dark yarn can hide an accidental missed stitch. For help comparing fibers and reading yarn labels, see the guide to choosing yarn for beginner crochet; use the weight and gauge specified for this project.
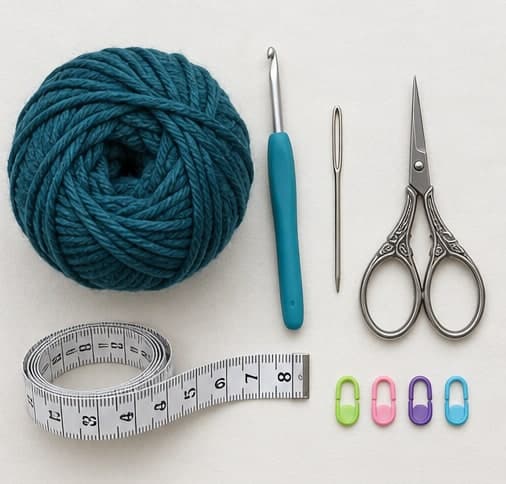
You need a crochet hook, blunt tapestry needle, scissors, measuring tape, and four removable stitch markers. Start with a 5 mm hook for worsted-weight yarn, but use the size that gives a flexible fabric at the target gauge. The estimated yardage varies with your yarn, tension, and finished size. Make the swatch first and keep enough yarn to finish a matching second mitt.
For a gauge swatch, chain 25 and work 24 single crochets across the foundation. Continue in back-loop single crochet for at least 26 rows, chaining one and turning between rows. Wash and dry the swatch according to the yarn label. Count the stitches and rows across a central 4-inch section without stretching it. Aim for 16 stitches and 20 rows.
If you have more stitches per inch, your mitt will be shorter from wrist to knuckles at the same starting count. If you have more rows per inch, it will be narrower around the hand at the same row count. These are separate measurements. Adjust the hook if the fabric feels wrong, or calculate revised counts from a swatch you like. Stretch the swatch gently and check whether it recovers before deciding how snug to make the gloves.
Abbreviations and Notes
- Ch: chain.
- Sc: single crochet.
- BLO: back loop only, the top loop farther from you as you work the current row.
- St / sts: stitch / stitches.
- Turning chain: the chain one before each turned row; it never counts as a stitch here.
The foundation chain determines the length from wrist to knuckles. The number of rows determines the circumference around the hand. The seam joins the foundation edge to the last-row edge, so it runs from the wrist opening toward the fingers. Leaving a gap in that seam creates the thumb opening. You do not cut a hole into the crochet fabric. If you need a refresher on the core stitches used here, review basic crochet stitches for beginners before working through the project-specific counts.
Both mitts are made from the same rectangle instructions. Before sewing the second one, try the folded fabric on the opposite hand so that the seam falls along the thumb side. There is no designated decorative front, which makes this simple construction easy to mirror.
Measure for a Comfortable Fit
Measure around the widest part of your palm below the knuckles, excluding the thumb. Then measure the desired length from the wrist up to the point where you want the finger opening to sit. Keep that top edge below the finger joints so you can bend your fingers freely. Decide how much of your wrist should be covered before you start the foundation chain.
The sample's relaxed circumference is about 7.2 inches, which rounds to 7¼ inches for a practical tape-measure check. Depending on the yarn's stretch, this may suit a hand around 7½–8 inches in circumference. Try it on rather than treating that range as a guaranteed fit. If the fabric pulls tightly across the knuckles or restricts the thumb, add width before seaming.
To recalculate, multiply the desired mitt length by your stitches per inch. For a 7-inch length at four stitches per inch, use 28 stitches and chain 29. Multiply the desired relaxed circumference by your rows per inch. At five rows per inch, 36 rows give 7.2 inches. Record your chosen counts so the second glove matches.
Start the First Rectangle
Foundation: Chain 29 for the sample. Keep the chain even and relaxed. If your starting chains tend to be tight, use a slightly larger hook for the foundation, then switch back to the hook used for your swatch. A tight foundation edge will run along the seam and can restrict the finished mitt even when the rest of the fabric stretches.
Row 1: Sc in the second chain from the hook and in each remaining chain. Count 28 sc. Place a marker in the first stitch and another in the last stitch. Do not count the skipped chain as an extra stitch. If your count is incorrect, repair the foundation row now rather than compensating in a later row.
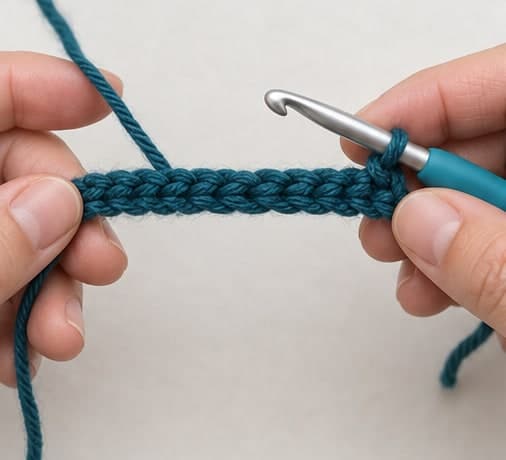
Row 2: Ch 1, turn. Work one sc in the BLO of every stitch across, including the first and last stitch: 28 sc. Move the markers into the new end stitches. The stitch nearest the turning chain can look compressed, so find its top loops before inserting the hook.
Complete and Check Both Panels
Rows 3–36: Repeat Row 2, keeping 28 sc in every row. Lay the work flat after a few rows and count again. The edges should remain parallel rather than widening gradually. Stop at 36 rows only if your gauge and fit check agree with the sample measurements.
The completed rectangle should measure about 7 inches along each row and 7.2 inches across the accumulated rows. Wash and dry it as you did the swatch if its dimensions change noticeably after washing. Do not stretch or pin it to force the target measurement. You need to know its relaxed size before joining it into a fitted tube.
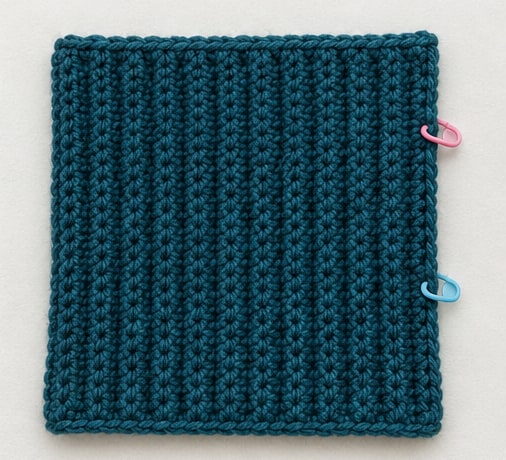
Fold the rectangle so that the foundation and final-row edges meet. Clip them together temporarily and slide your hand through the tube. Check that the fabric reaches your intended wrist and knuckle positions. It should stretch over the widest part of the hand without forcing. Add or remove complete rows to change the circumference; changing the seam tension will not correct a panel that is too narrow.
Make the second rectangle using your final stitch and row counts. Compare the pieces side by side after they have been treated the same way. If the second one is much larger, check whether you changed your tension or hook. Small differences in rows can be adjusted before sewing, but a different stitch gauge may require reworking the panel.
Mark and Sew the Thumb-Side Seam
On the sample, divide the 28 matched edge positions into three sections, starting at the wrist: 16 positions to sew, 6 positions to leave open, and 6 positions to sew above the thumb. At four stitches per inch, these sections correspond to about 4 inches, 1½ inches, and 1½ inches. Mark both ends of the thumb gap before you thread the needle.
Place the folded mitt against your hand and compare those markers with the base and upper side of your thumb. Move the opening if needed. Keep the total number of edge positions at 28 when redistributing them. For example, shifting the same six-position opening closer to the wrist means shortening the lower seam and lengthening the upper seam by the same amount.
With matching yarn, whipstitch the first 16 paired edge positions together from the wrist upward. Catch secure corresponding loops on both edges and keep the tension flexible. Fasten the seam securely at the lower thumb marker. Do not carry a tight yarn strand across the opening; finish this sewing yarn and use a separate length for the upper seam.
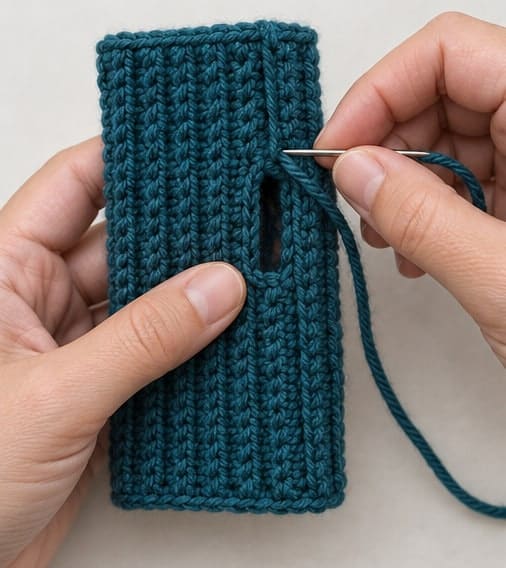
Leave the next six paired positions unsewn. Join a new length of yarn at the upper marker and sew the remaining six positions toward the finger opening. Secure and weave in the tails on the inside. At each end of the thumb gap, a small extra anchoring stitch can reinforce the seam, but avoid making a bulky knot that will rub against the skin.
Repeat for the other mitt, checking the opposite hand before making the final stitches. The wrist and finger ends both remain open. There is no thumb tube to add, and the plain edges do not need a separate ribbed cuff.
Try On the Pair and Finish the Edges
Put on both gloves and open and close your hands. Bend your wrists, spread your fingers, and move each thumb through a comfortable range. The thumb gap should not pull into the web of the hand. If it does, undo the appropriate end of the seam and enlarge or reposition the opening before securing the tails again.
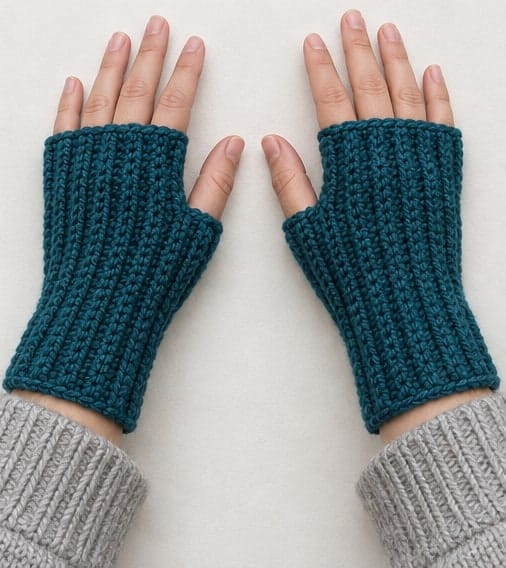
Check that the upper edge stays below the finger joints and the seam is not twisting across the palm. If the wrist is looser than you expected, remember that this is a straight tube, not a shaped glove. Reducing the entire circumference too much can make the palm uncomfortable. A narrower wrist requires a different shaped construction, so keep this version comfortably straight-sided.
Color and Length Variations
Work the pair in one color for clear vertical ribbing, or change colors between complete rows for narrow stripes around the hand. Finish the final yarn-over of a row with the new color, then chain one and turn. Match the stripe sequence on the second rectangle if you want identical gloves. Weave tails away from the thumb opening, where rubbing is most noticeable.
For a longer wrist section, increase the starting stitch count and recalculate the lower seam section. Keep the thumb opening near the same place relative to the knuckle edge. Do not simply add extra rows for length: in this construction, extra rows change the circumference. Write down the revised starting chain, total stitches, total rows, and opening position together. A crochet checkered scarf is another way to build a winter set around the colors you chose for these mitts.
Troubleshooting
One glove is tighter than the other
Compare the relaxed rectangles or finished tubes with a tape measure. Check row counts, hook size, and seam tension. If the fabric dimensions match but one seam feels rigid, resew that seam more loosely. If the fabric itself is narrower, adjust the panel instead of pulling on it until it stretches unevenly.
The thumb opening has a loose corner
Check the anchoring stitch at the end of each seam. Secure a loose corner through stable neighboring loops without closing the intended gap. Avoid repeatedly sewing through one fragile strand. If the opening is actually too large, close one paired position at a time and try the glove on again.
The first edge is shorter than the last edge
A tight starting chain can draw the foundation edge inward. Compare its flexibility with the last row. If the difference is large, restart with a more relaxed foundation rather than sewing unequal edges under tension. Also verify that you have maintained the same stitch count throughout the panel.
Quick Project Plan
| Step | Check before moving on |
|---|---|
| Prepare | Measure the hand and wash a gauge swatch |
| Crochet | Make two matching rectangles with constant stitch counts |
| Finish | Mark the thumb gaps, sew in two sections, and test both hands |
Frequently Asked Questions
Are these gloves different for the right and left hand?
The rectangles are identical. Position the seam along the thumb side of each hand when checking the opening. Because the fabric has no designated decorative front, you can mirror the placement without changing the written crochet rows.
Can I add a crocheted thumb later?
That would require a separate fitted thumb construction and new stitch counts. This version intentionally leaves a simple slit so the thumb remains free. First complete and fit the plain mitts rather than adding an unmeasured tube around the opening.
Why does the pattern give approximate rather than exact hand sizes?
Yarns differ in stretch and recovery even when their gauge matches. A hand's shape also matters, not only its circumference. The temporary folded-tube check is the most useful way to choose a comfortable size before sewing.
Can I use these while working with tools?
Keep loose crochet fabric away from rotating tools, moving machinery, and open flames. These mitts are casual clothing, not protective gloves. Remove them whenever fabric could snag or interfere with the grip required for an activity.
Do I need to add an edging round?
No. The sample uses the original crochet edges at the wrist, fingers, and thumb gap. An added edging can reduce stretch or make the opening smaller. If you choose to add one, test its tension and recheck the fit before finishing the yarn ends.
Final Thoughts
The important finish on these crochet fingerless gloves is the thumb opening. Two matching 28-stitch, 36-row rectangles give the sample its basic size, but carefully placed seams make it wearable. Check each hand separately, leave the six-position thumb gap only where it fits, and keep the join flexible enough for everyday movement.
Save a color combination for your next pair with Crochet by Season on Pinterest. If you adapt the wrist length or thumb placement, share your version with Crochet by Season on Facebook so other makers can see how the same rectangle changes with a different fit.