A chunky crochet scarf makes the most of a simple stitch: thick yarn gives half double crochet a substantial texture without a complicated repeat. This scarf is worked in short rows from one end to the other, so you can check its width early and keep adding length until it suits the wearer. The plain rectangular ends need no shaping, and the sample has no fringe to tangle inside a coat.
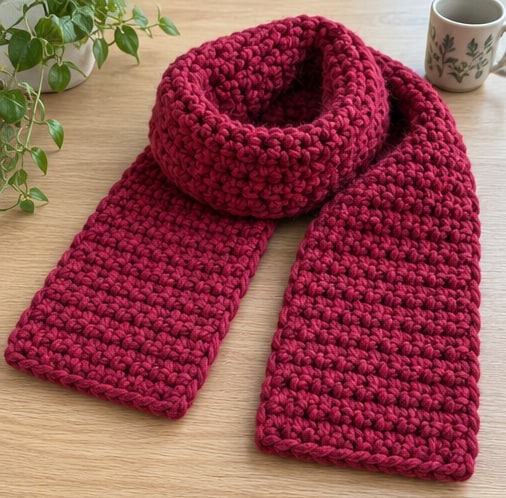
The instructions use US crochet terms. At the target gauge, 16 stitches and 90 rows produce a scarf approximately 8 inches wide and 60 inches long. Super bulky yarns vary considerably, so the finished measurements and fabric feel should guide your stopping point. This is a straightforward project, but the time needed still depends on your pace, swatching, and finishing choices. A crochet ear warmer makes a useful companion when you want warm accessories without wearing a full hat.
Project at a Glance
| Detail | Pattern information |
|---|---|
| Skill level | Beginner familiar with half double crochet |
| Terms | US crochet terminology |
| Construction | One rectangle worked across its short width |
| Yarn | Soft, plied super bulky yarn, category 6 |
| Hook | 8 mm starting size; adjust to your yarn and gauge |
| Main stitch | Half double crochet through both top loops |
| Gauge | 8 stitches and 6 rows per 4 inches, washed and relaxed |
| Sample size | Approximately 8 inches wide by 60 inches long |
| Sample counts | 16 hdc per row, 90 rows |
| Estimated yarn | 300–400 yards, including a modest finishing allowance |
| Finish | Plain square ends, no seam or fringe |
Materials and Gauge
Choose a soft, plied yarn that holds together when you pull it through the loops on your hook. Loosely spun roving-style yarn can look dramatic, but it may shed or pill differently and can be harder to undo cleanly. For a first scarf, a clearly defined strand makes it easier to see the stitches and correct an error. Test how the yarn feels against your neck, not only your hands. For help comparing fibers and reading yarn labels, see the guide to choosing yarn for beginner crochet; use the weight and gauge specified for this project.
Gather an 8 mm crochet hook, two removable stitch markers, scissors, a blunt tapestry needle with an eye large enough for the yarn, and a tape measure. Keep the yarn label for its care instructions. If the scarf is a gift, write down the fiber content and washing directions to include with it. Do not assume every super bulky yarn is machine washable.
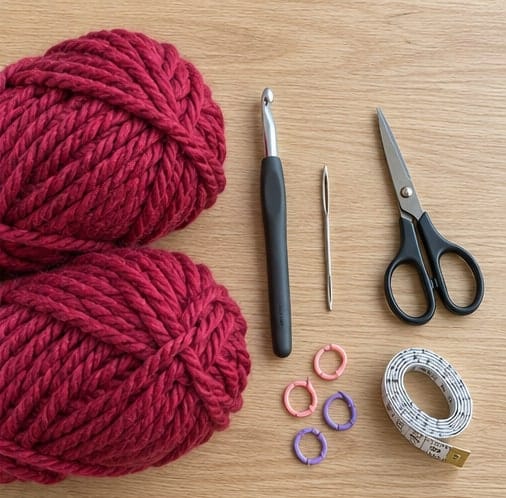
For a swatch, chain 16 and work 14 hdc across, beginning in the third chain from the hook. Continue for at least 10 rows, chaining two and turning between rows. Wash and dry according to the label, then count a central 4-inch section without stretching. The target is 8 stitches and 6 rows. The turning chain does not count as a stitch.
Check the fabric as well as the numbers. It should fold over your hand without feeling like a rigid mat. If the stitches are very dense, try a larger hook and swatch again. If there are large gaps that you do not want, try a smaller hook. You can use a different gauge when you like the resulting fabric, provided you recalculate both the width and length counts.
The 300–400-yard estimate is not a guarantee for every yarn. A dense strand or a longer scarf can use more. If you have a limited amount, weigh or measure what remains after the swatch and the first few rows. Avoid committing almost all of the yarn to the body before reserving enough to finish the final row and weave the ends.
Abbreviations and Notes
- Ch: chain.
- Hdc: half double crochet.
- St / sts: stitch / stitches.
- Turning chain: the two chains used before turning; they are not included in the stitch count.
For half double crochet, yarn over, insert the hook into the stitch, yarn over and pull up a loop. Yarn over once more and pull through all three loops on the hook. Work through both top loops of the stitch in this scarf. Using only a back loop or third loop would change the texture and the fabric's behavior. If you need a refresher on the core stitches used here, review basic crochet stitches for beginners before working through the project-specific counts.
Rows run across the 8-inch width. Adding stitches makes the scarf wider, while adding rows makes it longer. There are no increases, decreases, joined rounds, or seams. The first and last rows remain the two short ends of the finished scarf. Keep the same stitch count throughout so the sides remain parallel.
Choose Your Scarf Dimensions
An 8-by-60-inch scarf is a practical starting size for an adult draped scarf or a loose single wrap. Measure a scarf you already enjoy wearing if you have a preferred length. Consider the thickness of your coat and whether you want the ends to hang outside it or tuck inside. A very wide scarf in super bulky yarn can become heavy, even when the stitch pattern is simple.
At the sample gauge there are two stitches per inch. For an 8-inch width, use 16 stitches and add two chains for the foundation: chain 18. There are 1½ rows per inch, so a 60-inch length takes approximately 90 rows. If your swatch gives a different row gauge, divide its rows per 4 inches by four before multiplying by your desired length.
For example, eight rows per 4 inches equals two rows per inch. At that gauge, a 60-inch scarf would need around 120 rows rather than 90. This calculation tells you when to start checking, not when you must fasten off. Measure the actual relaxed scarf and try the intended drape before finishing.
Make the Foundation and First Rows
Foundation: Chain 18 for the sample. Aim for relaxed, uniform chains. A tight foundation can draw the first end into a narrow curve even when the rest of the scarf is the correct width. If this happens regularly, make the chain with a slightly larger hook, then return to the hook used for the swatch.
Row 1: Hdc in the third chain from the hook, then hdc in every remaining chain: 16 hdc. The two skipped chains do not count as a stitch. Put a marker in the first hdc and another in the last hdc. Count the actual stitches rather than relying on the number of visible bumps along the edge.
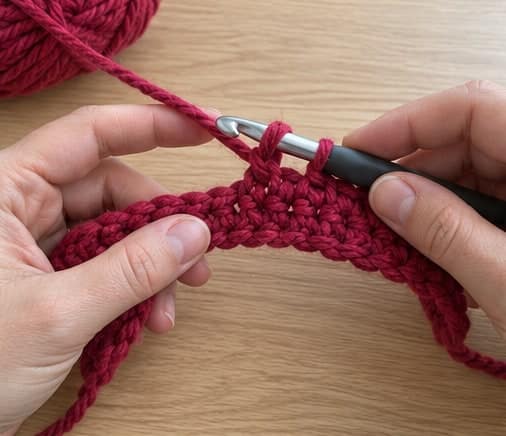
Row 2: Ch 2, turn. Hdc in the first stitch and in each remaining stitch, working through both top loops: 16 hdc. Do not work into the turning chain at the far end. Move each marker into the corresponding new end stitch. The marker is particularly helpful with thick yarn, where neighboring loops can crowd together.
After a few rows, lay the work flat and measure the width. If it is far from your target, correct the gauge or starting count now. Continuing with the hope that blocking will change the width dramatically can leave you with fabric that does not behave as intended.
Continue the Scarf Body
Rows 3–90: Repeat Row 2 for the sample, or continue until the rectangle reaches the length calculated from your washed gauge. Maintain 16 hdc in each row. Use a row counter or a written tally if you find it difficult to count the textured rows later. If you stop mid-row, leave a note so you do not accidentally count it as complete.
Support the scarf on your lap or table as it grows. Letting a heavy finished section hang from the hook can pull on the active row and change your tension. Keep your grip relaxed and pause if your hands feel uncomfortable. Thick yarn covers area quickly, but it should not require forcing the hook through tight loops.
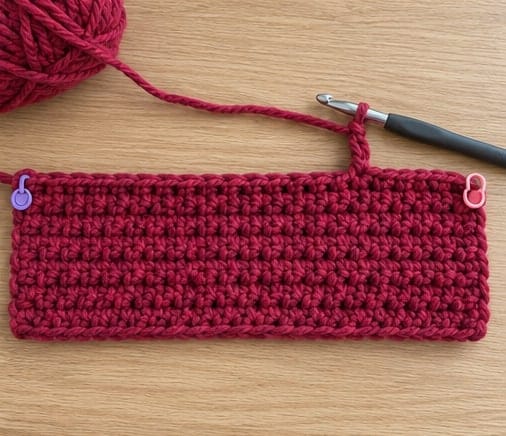
Check the edges after every short section of work. Both sides should remain straight. If the scarf begins to widen, count the last row and look for a stitch accidentally added in the turning chain. If it narrows, check whether the first or final stitch has been skipped. Undo the affected rows instead of hiding the error with a later increase or decrease.
When joining another ball, try to make the change at a row edge. Complete the final yarn-over of the last hdc with the new strand, then chain two and turn. Leave generous tails on both strands. Do not depend on a large knot alone, especially in smooth yarn that can work loose with repeated wearing and washing.
Finish the Plain Ends
When the length is right, complete the current row and check that it still contains 16 hdc. Fasten off with a tail long enough to weave securely into the fabric. The sample ends are left plain; you do not need an edging round to make the scarf complete. An extra border would add width, length, weight, and yarn use.
Thread the tapestry needle and weave each tail through several neighboring stitches on the less visible side. Change direction to help secure the tail, but do not pull the stitches into a tight ridge. With very thick yarn, avoid stacking several tails through the same small area, which can create a noticeable hard lump.
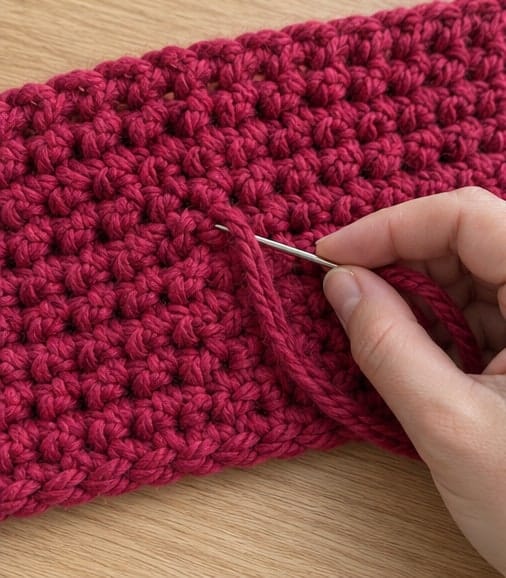
Gently stretch and relax the fabric before trimming. Check that the woven yarn stays in place and that no loop has been distorted. Follow the yarn label for washing, then lay the scarf flat and arrange the edges naturally. Avoid hanging it while wet, because the weight can lengthen one section more than another.
Check the Drape Before Calling It Finished
Try the scarf over the clothing you intend to wear. Check whether the ends sit at a useful length and whether a single loose wrap feels comfortable around the neck. A thick scarf can look shorter once wrapped than it does lying flat on a table, so this is worth testing before you trim every final tail.
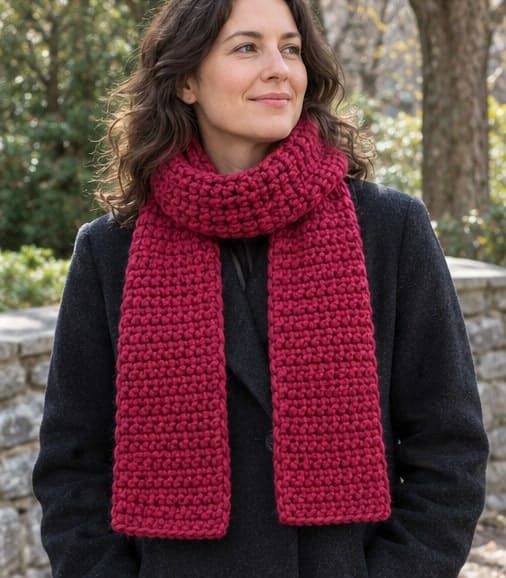
If you need more length, rejoin yarn at the last row and continue the same stitch count. If it is too long, undo complete rows from the finishing end rather than cutting the fabric. The starting edge and finishing edge are not interchangeable for unraveling. Keep loose scarf ends away from moving machinery or activities where they could catch.
Customize Without Losing the Straight Shape
For a narrower version at the sample gauge, 12 stitches make approximately 6 inches of width, so chain 14. Keep 12 stitches in every row thereafter. For a wider version, calculate the new stitch count from your own gauge and allow more yarn. Changing the width also changes the scarf's weight, which affects how it hangs.
Color blocks are simple to add at row boundaries. If you divide the 90-row sample into three equal sections, work 30 rows in each color. This gives approximately 20 inches per block only at the stated row gauge. Choose yarns with matching weight and care instructions, and test them together if their fiber blends differ. If you want to explore a more graphic color arrangement next, see the crochet checkered scarf.
Troubleshooting
My scarf has a narrow first end
Compare the starting chain with the final-row edge. If the chain is much tighter, the foundation is drawing the fabric inward. A small amount of unevenness may relax with washing, but a strongly constricted end is better restarted with a looser chain or larger foundation hook.
I keep splitting the thick yarn
Check whether the hook is entering both top loops cleanly instead of piercing individual plies. Slow down while drawing through the three loops of each hdc. A different hook tip may feel easier with your yarn. If a split strand is visibly snagged, correct it before the next rows make it harder to reach.
The scarf feels too heavy
Consider whether the width, length, or yarn density is more than you need. A narrower scarf or a less dense yarn may suit you better. Increasing the hook size can change the fabric, but it also changes the dimensions and stitch spacing, so swatch before remaking the project.
Quick Project Plan
| Step | Useful checkpoint |
|---|---|
| Prepare | Choose a soft yarn and calculate the width from washed gauge |
| Crochet | Maintain the stitch count and support the growing scarf's weight |
| Finish | Check the worn length, weave tails, and dry the scarf flat |
Frequently Asked Questions
Can I hold two thinner yarns together?
You can experiment, but two strands do not automatically match this super bulky gauge. Swatch with both held together and check the feel, stitch count, row count, and washing behavior. You need enough of each yarn for the full length.
Is a chunky scarf always a one-evening project?
No. Thick yarn reduces the number of stitches needed for a given area, but your speed, chosen size, and finishing work still determine the time. Plan breaks and allow time for the swatch to dry rather than rushing to match a promised completion time.
Why are there two turning chains if they do not count?
The chains provide height before the next row of half double crochet. In this pattern, the first hdc is still worked into the first stitch. Treating the chains as an extra stitch would change the count and can make the scarf widen.
Can I add fringe after finishing?
Yes, if you reserve extra matching yarn and want that finish, but it is not included in the sample. Attach it evenly and securely, and consider whether loose strands will be practical for the wearer. The plain-ended scarf needs no fringe to keep its shape.
How do I store it without stretching the stitches?
Fold or loosely roll the clean, dry scarf. Avoid leaving it hanging by one small section for a long period, especially if the yarn is heavy. Follow the yarn label for any special storage or moth-protection needs.
Final Thoughts
For this chunky crochet scarf, a consistent 16-stitch width is the main counting job. The sample's 90 rows aim for 60 inches at the stated gauge, but the best stopping point is the length that hangs comfortably on the wearer. Keep the foundation relaxed, support the fabric as it grows, and finish with well-woven tails rather than a bulky seam or unnecessary border.
Save a favorite winter shade with Crochet by Season on Pinterest, and share your finished scarf or color-block version on our Facebook page. A note about your yarn weight and finished length can help another maker choose their own proportions.