A crochet cowl gives you a warm layer around the neck without long scarf ends to arrange. This version is a single loop made from one flat rectangle of half double crochet. You work short rows to build the length, then join the two short ends with a straight seam. The result is a simple, softly textured neck warmer that can sit over a sweater or inside an open coat.
These instructions use US crochet terms. The sample is planned at approximately 32 inches around and 8 inches high, using 24 stitches per row and 64 rows at the stated gauge. It is a loose single-loop cowl, not a double-wrap infinity scarf. Check that it passes comfortably over your head before finishing the seam, especially if you change the circumference or choose a less flexible yarn. Complete the cold-weather set with these crochet fingerless gloves, checking the separate gauge and hand measurements before you start.
Project at a Glance
| Detail | Pattern information |
|---|---|
| Skill level | Beginner familiar with half double crochet |
| Crochet terms | US terminology |
| Construction | Flat rectangle, short ends joined without a twist |
| Yarn | Smooth bulky-weight yarn with a soft feel against the neck |
| Hook | 6.5 mm starting size; change as needed for gauge |
| Main stitch | Half double crochet through both top loops |
| Target gauge | 12 stitches and 8 rows per 4 inches, washed and relaxed |
| Sample rectangle | 8 inches by 32 inches |
| Finished cowl | Approximately 8 inches high and 32 inches around |
| Estimated yarn | 220–300 yards plus a swatch allowance |
| Seam | Edge-to-edge whipstitch using matching yarn |
Materials and Gauge
For the main sample, choose a smooth bulky yarn rather than an extremely thick roving-style yarn. The stitches should have enough structure to keep the fabric from feeling limp, but the finished rectangle must still fold comfortably. Check softness against the neck before buying several balls. A yarn that feels fine in your hand can feel scratchy near your jaw. For help comparing fibers and reading yarn labels, see the guide to choosing yarn for beginner crochet; use the weight and gauge specified for this project.
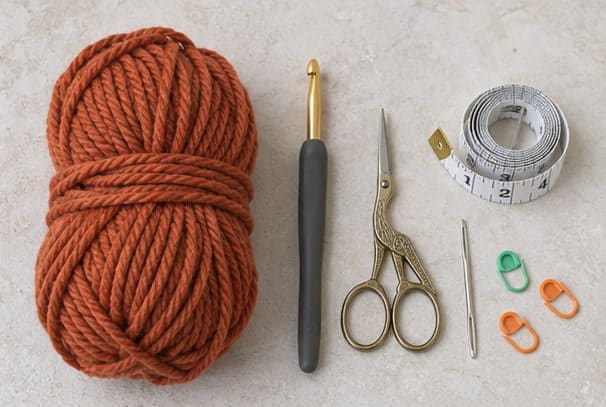
Gather a crochet hook, scissors, blunt tapestry needle, flexible tape measure, and two removable stitch markers. A 6.5 mm hook is a useful starting point, but the label and swatch should guide the final choice. Buy enough of the same dye lot if using a solid color. The yardage is an estimate because yarn density and personal tension change how much fiber each stitch uses.
Make a swatch by chaining 20 and working half double crochet into the third chain from the hook and each remaining chain: 18 stitches. Continue for at least 12 rows, chaining two and turning between rows. Do not count the turning chain as a stitch. Wash and dry the swatch according to the yarn label, then measure a central 4-inch area without stretching.
The target gauge is 12 stitches and 8 rows per 4 inches. If there are too many stitches, try a larger hook; if there are too few, try a smaller hook. Also feel the fabric. A perfectly matched count is not helpful if the cowl is too stiff to fold at the neck. If you prefer your own fabric, use its stitches and rows per inch to recalculate the rectangle instead.
Abbreviations and Pattern Notes
- Ch: chain.
- Hdc: half double crochet.
- St / sts: stitch / stitches.
- Turning chain: the two chains used to turn at the end of a row; they do not count as a stitch in this pattern.
To make a half double crochet, yarn over, insert the hook into the stitch, yarn over and draw up a loop. You should have three loops on the hook. Yarn over again and draw through all three loops. Work through both top loops unless the instructions explicitly say otherwise. This pattern does not use back-loop-only ribbing or the third-loop technique. If you need a refresher on the core stitches used here, review basic crochet stitches for beginners before working through the project-specific counts.
Each row runs across the cowl's height. Adding stitches makes the cowl taller; adding rows makes it larger around the neck. The short foundation edge is joined to the last-row edge after the rectangle is finished. Do not rotate either end before sewing, because this is a plain loop rather than a twisted cowl.
Choose the Height and Circumference
Start by deciding how you want the cowl to sit. An 8-inch height can fold softly without covering the whole face. A 32-inch circumference leaves space around the neck and is intended as a single loose loop. These dimensions are a design starting point, not a promise of the same drape on every wearer. Shoulder width, neck length, and yarn softness all affect the appearance.
For a custom height, multiply the desired inches by your stitches per inch. At three stitches per inch, 8 inches requires 24 hdc. Add two chains for the foundation because Row 1 begins in the third chain from the hook. For a custom circumference, multiply the desired inches by your rows per inch. At two rows per inch, 32 inches requires 64 rows.
Before choosing a much smaller loop, check that its opening will pass over the head comfortably. Use a scarf or strip of similar fabric to estimate the opening, then confirm with the actual crochet rectangle clipped into a loop. Do not rely on neck circumference alone. If it is a gift and you cannot check the wearer, avoid an unusually tight neckline.
Crochet the Foundation Rows
Foundation: Chain 26 for the sample. Keep the chains relaxed and uniform so the foundation edge does not pull shorter than the final row. If you habitually make tight chains, use a slightly larger hook for the chain only, then return to your swatched hook. Lay the chain flat before continuing and look for any accidental skipped or doubled chain.
Row 1: Hdc in the third chain from the hook and in each remaining chain across: 24 hdc. The two skipped chains do not count as a stitch. Mark the first and last hdc so you can find the true ends of the row. Count now, while it is easy to undo a small section.
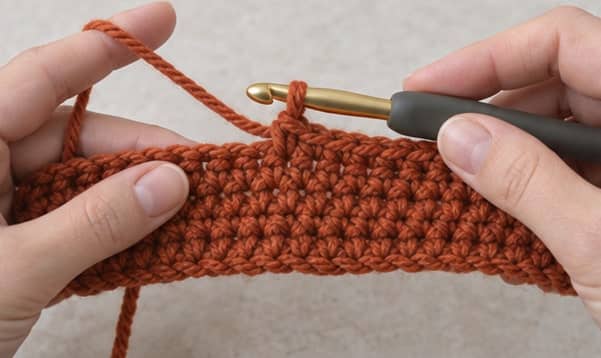
Row 2: Ch 2, turn. Hdc in the first stitch and in every stitch across, working through both top loops: 24 hdc. Do not skip the first stitch beside the turning chain, and do not work into the turning chain at the opposite end. Move the markers to the new first and last stitches.
Work slowly at the final stitch. Its loops can lean toward the edge, which makes it easy to miss. If you find it difficult to distinguish from the turning chain, keep the marker in place until the hook has entered the stitch, then move it after the stitch is complete.
Build the Full Rectangle
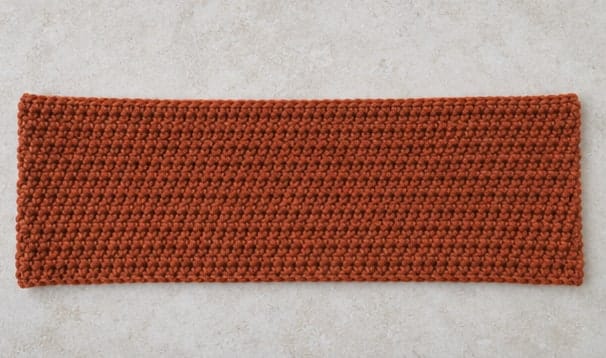
Rows 3–64: Repeat Row 2, keeping 24 hdc in every row. At the sample gauge, the rectangle should measure approximately 8 inches along each row and 32 inches across all 64 rows. Measure the work resting on a flat surface rather than holding it up, where its weight can stretch it.
Count stitches periodically and check both long edges. A small error near the beginning can turn into a noticeable wedge by the time the rectangle is complete. If one edge is growing outward, look for an extra stitch in the turning chain. If it is narrowing, check whether you have missed the first or last hdc.
If you need a new ball of yarn, join it at a row edge where possible. Complete the last yarn-over of the final hdc with the new strand, then chain two and turn. Leave tails long enough to weave securely through several stitches later. Avoid tying a large knot that could sit directly against your neck.
When the length is close to your target, compare it with the washed swatch. If washing changes your yarn significantly, secure the working loop and wash the rectangle before deciding its final length. Dry it without pulling the edges beyond their natural shape. Add or remove rows only after you know the relaxed measurement.
Join the Short Ends
Leave a generous sewing tail, approximately 30–36 inches, and thread the tapestry needle. Place the rectangle flat, bring the short ends together, and match their corners. Follow one long edge around the loop with your finger to confirm there is no twist. Clip the two corners together before starting the seam.
Match the 24 final-row stitches to the 24 corresponding foundation positions. Whipstitch the edges together, catching stable loops on both sides. Keep the edges butted together rather than overlapping them. This keeps the seam flatter and avoids using up a strip of the finished circumference as a bulky seam allowance.
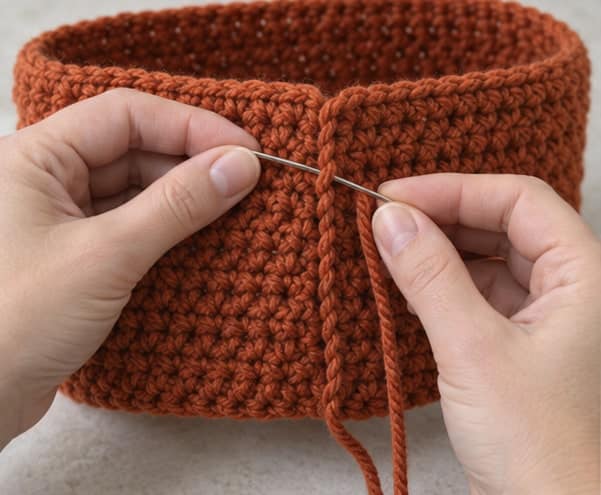
After every few stitches, spread the join gently and check its flexibility. The sewing yarn should close the gap without pulling the edge into a puckered ridge. If the seam becomes shorter than the neighboring fabric, loosen the last few stitches before continuing. It is easier to correct the tension as you sew than to redistribute it across a finished tight seam.
Before securing the final tail, put the cowl over your head and arrange it around your neck. If the opening feels restrictive, undo the seam and add rows to the rectangle. If you want a smaller loop, remove rows gradually, remembering that two rows equal about one inch at the sample gauge.
Finish and Arrange the Cowl
Weave yarn ends through the inside of the fabric in more than one direction, taking care not to pull the stitches out of shape. Test a gentle stretch before trimming the ends. Follow the yarn label for washing, then reshape the loop on a flat surface. Do not hang a wet cowl from one edge, where its weight can distort the fabric.
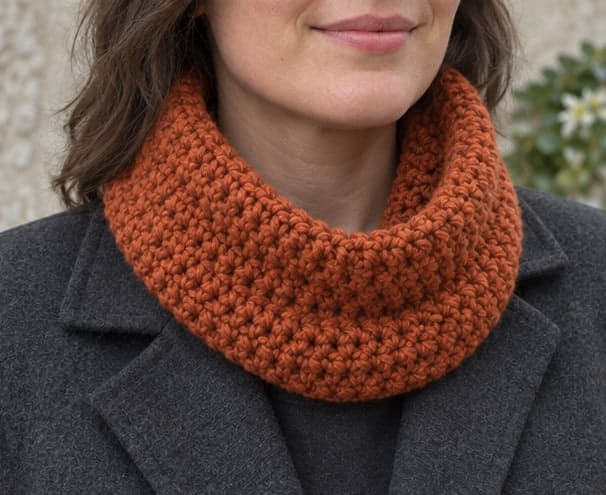
Wear the seam at the back or turn it slightly toward one shoulder if that feels more comfortable. Let the top edge fold naturally rather than forcing it into a stiff roll. Check the fit over the clothes you plan to wear with it. A thick sweater collar can make the same cowl feel much fuller than it does over a thin shirt.
Customize the Color and Texture
For a color-blocked cowl, change color between complete rows and keep the total row count at the length you need. For example, two blocks of 32 rows each make the sample's 64-row rectangle. Use yarns of the same weight and similar fiber behavior so one block does not stretch or shrink differently after washing.
If you choose a different stitch, make a new swatch and recalculate both measurements. Single crochet is usually shorter per row than half double crochet, while a taller stitch changes the drape and openness. The original counts belong to this half-double-crochet fabric; keeping them unchanged with another stitch may produce a very different cowl. If you prefer long ends instead of a closed neck loop, consider this crochet checkered scarf for your next project.
Troubleshooting
The top and bottom edges flare outward
Check for extra stitches near the turning chain and compare the row counts at both edges. Also examine whether your turning chains are unusually loose. If the stitch count is correct and only the seam area flares, distribute the sewing stitches more evenly across the matched positions.
The fabric stands up instead of draping
The yarn and hook combination may be too firm for the intended loose loop. Wash the swatch before judging it, but do not assume washing will fix very dense fabric. Try a larger hook with a new swatch, then calculate the new counts from that fabric's gauge.
The join is easy to feel at the back of my neck
Look for overlapped fabric, bulky knots, or an overly tight seam. Reseam edge-to-edge with relaxed tension and weave tails along different paths instead of building one thick lump. Placing the seam slightly to one side can help, but it should not replace correcting an uncomfortable join.
Quick Project Plan
| Step | What to verify |
|---|---|
| Prepare | Softness, washed gauge, and comfortable head opening |
| Crochet | Constant 24-stitch rows and a rectangle near the intended dimensions |
| Finish | No twist, flexible seam, secure tails, and a comfortable single loop |
Frequently Asked Questions
Is this the same as an infinity scarf?
It is a closed loop, but the sample is sized for one pass around the neck. A double-wrap infinity scarf needs a longer rectangle and more yarn. Do not force this 32-inch loop into two wraps.
Can I work this pattern in the round instead?
That changes the construction and the way the rows meet. This version is deliberately worked flat so the width stays easy to count and the circumference can be adjusted before sewing. Follow the flat instructions for the stated dimensions.
What if my row gauge is ten rows per four inches?
That equals 2½ rows per inch. For a 32-inch rectangle, you would need approximately 80 rows rather than 64, assuming you like the fabric. Confirm the actual measurement and fit before finishing.
Does the cowl need a border?
No. The sample keeps the natural half-double-crochet edges. A border can change the height, firmness, and stretch of the openings. If you add one, recheck that the finished loop passes comfortably over the head.
Can I use leftover yarns together?
Yes, if their weights, care requirements, and stretch are compatible. Make a small combined swatch before committing to the full rectangle. Two yarns that look similar in a ball can behave differently after washing.
Final Thoughts
This crochet cowl depends on two simple measurements: the 24 stitches set the sample's 8-inch height, and the 64 rows set its 32-inch circumference at the target gauge. Keep those directions clear as you customize, and test the opening before securing the seam. A flexible join and yarn that feels pleasant at the neck matter more than forcing an exact row count.
Collect future cowl color combinations with Crochet by Season on Pinterest, or show how you styled your finished single-loop neck warmer on our Facebook page. Include your yarn choice if you share a version, since it makes a noticeable difference to the drape.