A crochet hot water bottle cover can add a plain, washable layer of color while remaining easy to remove. This slate-blue design uses a shaped front and two overlapping back panels rather than a tight opening that forces the bottle through the neck. Single crochet keeps the fabric simple, and two small buttons hold the back overlap closed without a long drawstring.
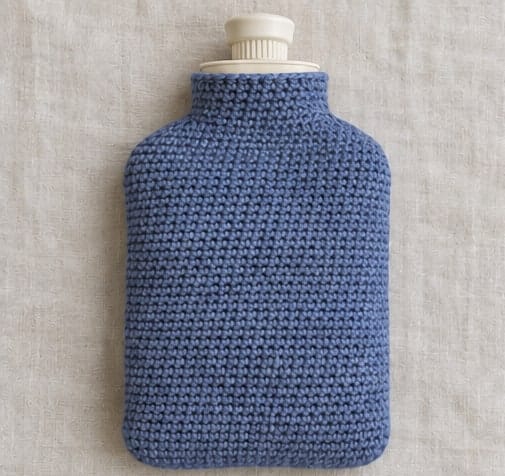
The instructions use US crochet terms and give a measured sample, not a universal fit for every bottle. At the target gauge, the unseamed front is about 8.4 inches wide and 11.2 inches tall, including shoulders and neck. This handmade cover has not been tested for thermal protection and must not replace a manufacturer-required protective cover. Follow the instructions for your exact bottle; if compatibility is uncertain, use this as a decorative cover for an empty bottle only. Generated photographs illustrate the construction, not proof of heat safety. For other useful handmade presents to pair with this project, browse crochet gifts for women.
Project at a Glance
| Detail | Sample specification |
|---|---|
| Skill level | Confident beginner comfortable with decreases and sewing |
| Terms | US crochet terms |
| Construction | One shaped front, one shaped upper back, one rectangular lower back |
| Yarn | Smooth DK cotton for the sample; suitability does not imply thermal protection |
| Hook | Start with 3.5 mm and adjust to gauge |
| Main stitch | Single crochet through both loops |
| Target gauge | 20 sc and 24 rows per 4 inches, washed and relaxed |
| Front body | 42 stitches across and 54 rows before shoulder shaping |
| Shoulders | Five rows, decreasing four stitches per row |
| Neck | 22 stitches across and eight plain rows |
| Back overlap | Eight rows, approximately 1.3 inches |
| Approximate yarn | 220–280 yards, with extra for swatching and resizing |
| Fastening | Two short chain loops and two smooth sewn buttons on the back |
Materials and Gauge
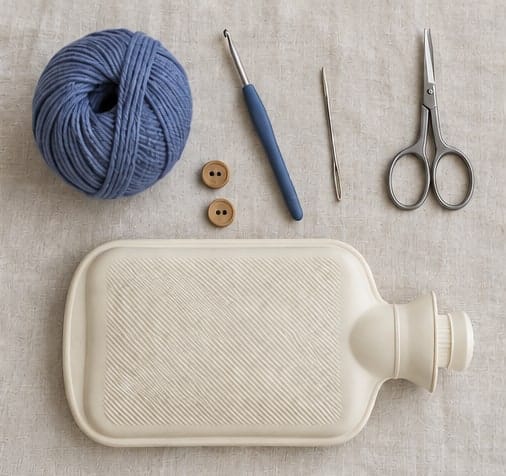
You will need the intended bottle, its instructions, yarn, hook, a blunt yarn needle, scissors, a flexible tape measure, removable markers or clips, and two smooth buttons around 5/8 inch across. Choose buttons that can be sewn securely without rough edges against the bottle. Do not use pins through the bottle or sharp hardware inside the cover. For help comparing fibers and reading yarn labels, see the guide to choosing yarn for beginner crochet; use the weight and gauge specified for this project.
Swatch a rectangle larger than four inches square in single crochet. Wash and dry it according to the yarn label, then measure the center without stretching. The target is five stitches and six rows per inch. Use a smaller hook if your stitches are too large, or a larger hook if they are too small, and repeat the swatch before calculating panel sizes.
Cotton is used here for a clear, washable fabric, not because this pattern establishes a safe temperature or insulation value. Do not add an untested liner and assume that it makes hot use safe. If the bottle requires its own protective cover, retain that protection and confirm that an additional handmade layer is permitted and fits without compression.
Measure Before Choosing the Sample Size
Work with an empty, cool bottle only. Remove it from use while measuring and sewing. Record its broad body width, straight body height, shoulder shape, neck width, and the location of the mouth and stopper. Follow the manufacturer's care and inspection instructions; do not cover a damaged bottle to hide a worn area.
Lay the bottle on paper and trace a reference outline without pressing on it. Compare your washed swatch and eventual panels against that outline. The cover needs room for the bottle's thickness and shallow seams, not a skin-tight fit. Keep the mouth, stopper, and any area needed for filling or checking fully accessible. The stated sample dimensions are panel dimensions before seam take-up.
If the sample clearly does not match your bottle, adjust the stitch count and row counts before making all three pieces. At five stitches per inch, adding two stitches changes a panel's width by about 0.4 inch. At six rows per inch, adding six rows changes height by about one inch. Make the front first and compare it with the bottle before committing to the back pieces.
Do not stretch a small cover over a bottle or pull the fastening tight to force a fit. If you cannot obtain a loose, accessible fit consistent with the bottle's instructions, stop at a decorative empty-bottle use rather than improvising with hot water.
Abbreviations and Construction Notes
- Ch: chain.
- Sc: single crochet.
- Sc2tog: single crochet two stitches together, reducing two stitches to one.
- Sl st: slip stitch.
- St / sts: stitch / stitches.
The turning chain does not count as a stitch. Work through both top loops and keep one stitch in every stitch except where decreases are specified. For sc2tog, draw up a loop in each of the next two stitches, yarn over, and pull through all three loops on the hook. If you need a refresher on the core stitches used here, review basic crochet stitches for beginners before working through the project-specific counts.
The front has a nine-inch straight body, a short shoulder section, and an open-ended neck. The upper back has the same shoulders and neck but a shorter body. The lower back fills the remaining body area, overlapping the upper back by eight rows. Only the outer perimeter is sewn; the horizontal overlap remains open so the bottle can be removed.
Crochet the Shaped Front
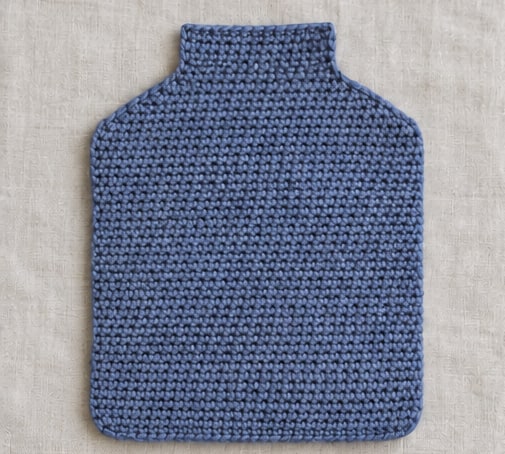
Foundation: Chain 43.
Front Row 1: Sc in the second chain from the hook and in every remaining chain. You have 42 sc. Chain 1 and turn.
Front Rows 2–54: Sc in each stitch, maintaining 42 sc. Chain 1 and turn after each row. At the target gauge, the rectangle is approximately 8.4 inches wide and nine inches tall.
For each shoulder row, work sc2tog twice at the beginning, sc across until four stitches remain, then work sc2tog twice at the end. This uses four old stitches at each edge and produces two new stitches there, reducing the total by four. Chain 1 and turn after each shoulder row.
| Front row | Stitches after the row |
|---|---|
| 55 | 38 |
| 56 | 34 |
| 57 | 30 |
| 58 | 26 |
| 59 | 22 |
Front Rows 60–67: Sc in all 22 stitches. Chain 1 and turn between rows. After Row 67, fasten off and weave in the tail without drawing in the top edge. These eight rows form the short neck section, approximately 1.3 inches high.
Place the panel beside your empty bottle and reference outline. Check that the shoulders do not force the bottle into a different shape and that the neck stops below the mouth and stopper. Adjust this first panel before making the matching upper back. A loose collar is preferable to a tight one that restricts access, but an excessively large cover that shifts also needs resizing.
Crochet the Two Back Panels
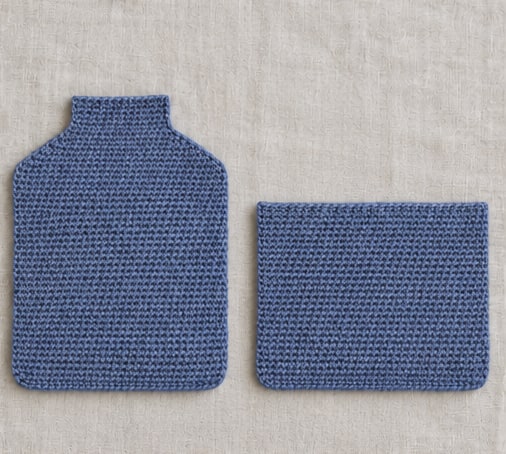
Upper back
Chain 43. Work 42 sc across Row 1, then continue with 42 sc through Row 30, chaining one and turning between rows. This creates a five-inch rectangular section at the target gauge.
Work the same five shoulder-decrease rows used on the front. Upper-back Rows 31–35 finish with 38, 34, 30, 26, and 22 stitches respectively. Work eight plain rows of 22 sc for Rows 36–43, then fasten off. The shoulder and neck edges must match the front exactly.
Lower back
Chain 43 and work 42 sc in Row 1. Continue in plain single crochet for a total of 32 rows, maintaining 42 stitches. Fasten off. The sample lower back is about 8.4 inches wide and 5.3 inches high.
The back's straight-body arithmetic is 30 upper rows plus 32 lower rows minus eight overlapping rows, giving 54 rows to match the front. If you change the body's height, preserve that relationship with your new counts. The overlap is necessary; two panels that merely meet at an edge will leave an exposed opening.
Lay all three pieces flat and compare their widths. Correct any tension drift now. Do not try to solve mismatched widths by stretching one panel while sewing, because the cover may distort again after washing.
Arrange and Seam the Cover
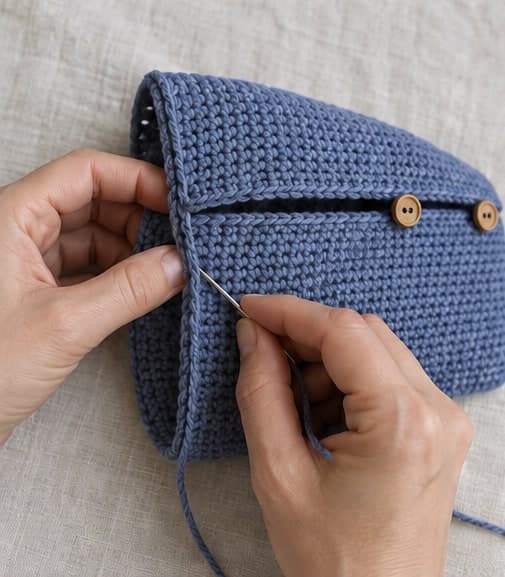
Place the front with its intended outside facing the table. Position the lower back over it with its outside facing you and its bottom edge aligned with the front's bottom. Position the upper back with its outside facing you, aligning its shoulders and neck with the front. The upper back lies over the lower back in the overlap area.
For the sample, the lower back reaches 32 rows up from the bottom. The upper back's lower edge sits 24 rows up from the bottom, so the two back pieces overlap for eight rows. Mark both ends of that overlap. Keep the horizontal lower edge of the upper back free; it is the outer flap of the opening.
With matching yarn, whipstitch the outer side edges, shoulders, neck sides, and bottom to the corresponding front edges. Match row ends along straight sides and work evenly around the sloped shoulders. At the overlap, catch all three layers only along the outer side edges. Do not stitch across the horizontal opening, and leave the complete top neck opening unsewn.
Use shallow seams and avoid hard knots or rough ends inside. This construction leaves the neat perimeter seam on the outside; there is no need to turn the cover through and bunch the corners. Remove clips as you sew and count them afterward so none remain hidden between the layers.
Add Two Short Button Loops
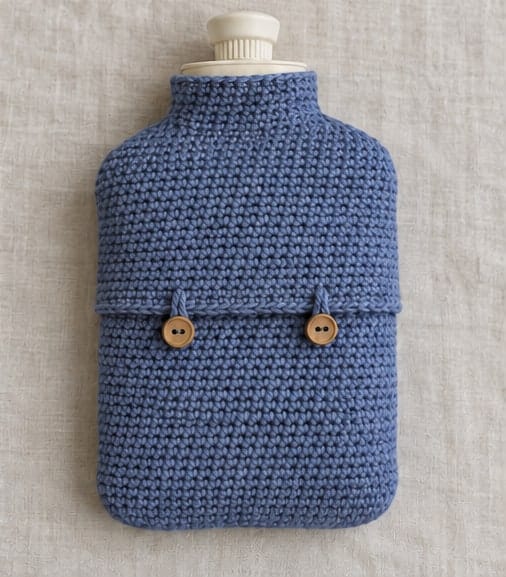
On the free lower edge of the upper back, mark two loop positions roughly one-third and two-thirds across the width. Join yarn securely at the first mark, chain eight as a trial, and slip stitch back into the same edge area. Repeat at the second mark. The loops should be short and fitted to the chosen buttons, not long dangling ties.
With the cover lying flat and the overlap resting naturally, mark corresponding button positions on the lower back just below the outer flap edge. Sew the buttons to that lower panel only, taking several passes through multiple sturdy crochet strands. Do not accidentally sew through the front or stitch the opening closed.
Adjust the loop length before fastening its tails if it is too tight or loose. The closure should hold the fabric overlap in position without squeezing the bottle. Secure the ends and check the reverse for rough stitching. If any part of the closure presses into the bottle, revise the placement or leave the cover for decorative empty-bottle use.
Fit Check and Safe-Use Boundaries
Open the back flap and insert the empty, cool bottle without forcing it. Guide the neck into position and check that the mouth and stopper remain entirely accessible. Fasten the buttons without stretching the cover. Then remove the bottle again to confirm that the opening is genuinely usable for inspection and care.
Follow your bottle's own instructions for filling, permitted covers, replacement, and use. Do not fill it with boiling water, conceal wear or leaks, or use it as a cushion. The crochet pattern does not provide a filling procedure, a safe contact time, or a temperature rating. A handmade fabric layer does not prove that prolonged skin contact is safe.
Never use the crochet neck, loops, or buttons to carry a filled bottle. Do not put the bottle or this cover in a microwave or oven. Keep the accessory away from young children and anyone who cannot reliably judge heat or remove the bottle independently. If you are unsure whether the cover is appropriate for your bottle or circumstances, ask the manufacturer and use the cover only decoratively in the meantime. A crochet ear warmer offers another way to use soft yarn for a winter gift without fitting it around a bottle.
Care and Troubleshooting
Remove the cover for washing and follow the yarn label. Let it dry completely, reshape it flat, and repeat the empty-bottle fit check afterward. Check button stitching, loop wear, and seam condition. Cleaning the cover is not a substitute for inspecting the bottle itself.
The back opening gaps
Check the overlap count and panel alignment. The sample requires eight overlapping rows, with the upper flap outside. Do not tighten the buttons to compensate for back panels that are too short. Remake the affected panel with sufficient overlap.
The shoulders wrinkle
Compare the shoulder profile with the empty bottle. The fixed five-row sample taper may not suit your model. Adjust both front and upper back consistently rather than sewing folds into the cover or pulling the fabric tight over the bottle.
The cover is tight after washing
The washed swatch should reveal likely dimensional changes, but check the finished piece too. Do not force a shrunken cover into service. Resizing or using it only as an empty-bottle decoration is preferable to pressure from a tight wrap.
Quick Project Plan
| Step | Work | Checkpoint |
|---|---|---|
| 1 | Read bottle instructions, measure, and swatch | Compatibility and accessible mouth confirmed |
| 2 | Make front and matching back pieces | 54 body rows equal 30 plus 32 minus 8 |
| 3 | Sew only the outer perimeter | Back opening and top neck remain open |
| 4 | Fit short loops and buttons | Empty bottle enters and leaves without force |
Frequently Asked Questions
Does this fit every two-liter bottle?
No. Capacity does not specify the outer shape, neck width, or shoulder profile. Measure your exact bottle and compare it with the sample panel dimensions before making the cover. Any manufacturer-required cover must also be considered when checking compatibility and fit.
Why use a back opening instead of a drawstring neck?
The overlapping opening allows the empty bottle to be removed without pushing its broad body through a narrow collar. It also avoids a long cord around the neck. Keep the opening functional rather than sewing it closed after the first fitting.
Can I remove the manufacturer's original cover?
Not on the basis of this pattern. This handmade cover has no verified thermal-protection rating and does not replace protection required by the manufacturer. Follow the instructions for the exact product and ask the manufacturer if you are uncertain.
Is a thick crochet fabric enough to prevent burns?
No such claim is made here. Thickness, stitch density, and fiber choice do not establish a safe temperature or contact duration. Treat this as a craft pattern, not as a tested protective product.
Can I make the cover without buttons?
You would need to verify that the overlap stays properly positioned without a fastening. Do not replace the buttons with a tight cord around the bottle. For this written version, the two short loops hold only the fabric flap; they must not apply pressure to the bottle.
Final Thoughts
The useful feature of this crochet hot water bottle cover is its removable, three-piece construction. Match the panels to your own bottle, keep the eight-row back overlap, and leave the mouth and stopper unobstructed. A tidy finish is worthwhile only when the cover remains easy to remove and consistent with the bottle manufacturer's instructions; uncertain compatibility means decorative empty-bottle use only.
Save the slate-blue palette with Crochet by Season on Pinterest, or share your finished empty-bottle cover and the sizing adjustments you made on Crochet by Season on Facebook.