A crochet maple leaf wall hanging gives a plain wall, entryway, or mantel a finished autumn detail without needing a large project. This version uses a simple branch, cotton cord, and several leaves worked from the site’s crochet maple leaf pattern, then turns them into a balanced display you can size for your own space.
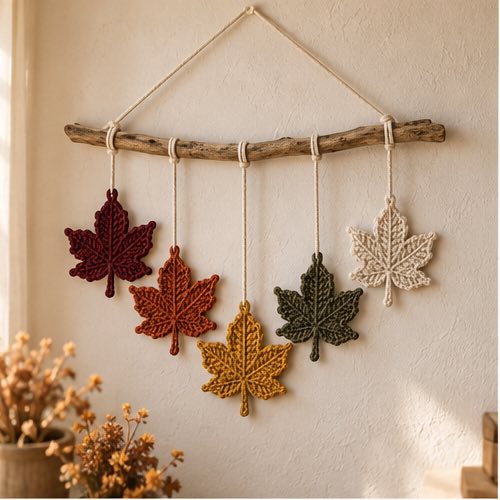
The construction is beginner-friendly because each leaf is made separately before you decide the order, spacing, and hanging lengths. Make five leaves for a compact display or seven for a wider branch. US crochet terms are used throughout. The sample is about 22 inches wide and 19 inches long, including the hanging cord.
Project at a Glance
- Skill level: Beginner-friendly finishing project
- Crochet terms: US terms
- Construction: Individual maple leaves tied to a natural branch
- Yarn: Worsted-weight cotton or cotton blend
- Hook: 4 mm / G hook, or the hook that gives firm leaves
- Finished size: About 22 by 19 inches with five leaves
- Approximate yarn: 20 to 30 g per leaf color, plus 2 yards of hanging cord
- Helpful finish: Light blocking keeps each point crisp before assembly
Materials and Gauge
Choose three to five fall shades that sit well together, such as burgundy, rust, mustard, olive, and warm cream. Cotton gives a clean edge and holds the leaf shape well. You will also need a 20 to 24 inch dry branch, strong cotton cord or twine, a yarn needle, scissors, a tape measure, and optional wooden beads. Gauge is not critical, but your leaves should look flat and firm rather than loose or floppy.
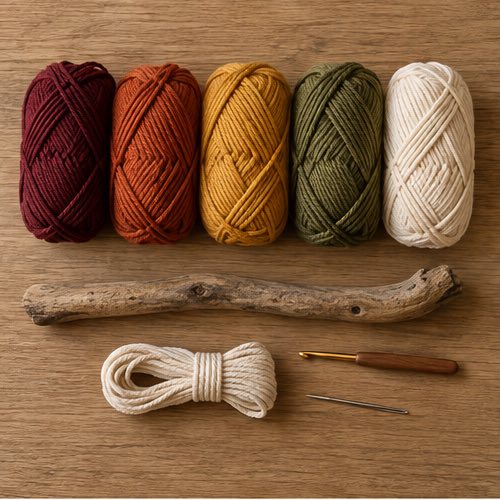
If you are deciding between fiber types, use the same practical approach as the best yarn for beginner crochet guide: choose a smooth yarn that lets you see every stitch. Make one leaf first, measure it, and use that size to decide how many leaves your branch needs.
Make the Maple Leaves
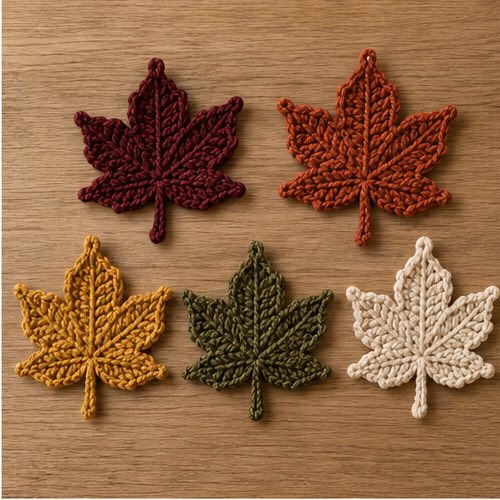
Work five maple leaves using the linked maple leaf tutorial. For the display shown here, make two dark leaves, two warm mid-tone leaves, and one brighter center leaf. Weave in every tail neatly, but leave no extra yarn for hanging: the cord will carry the weight instead.
Lay the finished leaves on a table before you attach anything. Place the brightest leaf in the middle, then alternate the darker and warmer colors outward. This small planning step prevents the wall hanging from looking accidental once it is on the branch.
Block and Shape the Leaves
Pin each leaf lightly onto a blocking mat or a thick towel. Pull the five points into an even maple shape, keeping the center point slightly longer than the side points. Mist the leaves with water or use gentle steam held above the fabric. Let them dry completely before removing the pins.
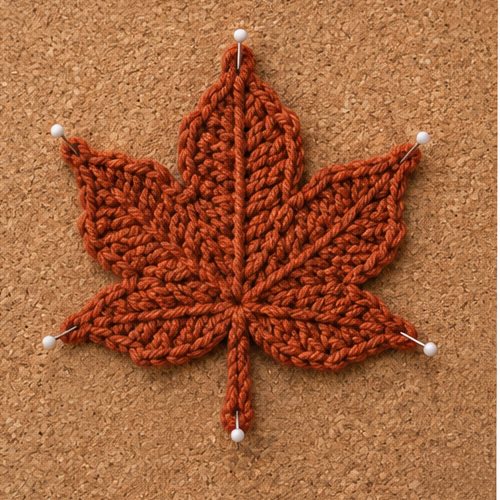
Blocking matters more here than it does for a soft accessory because the wall hanging is viewed from a distance. A firm, even silhouette makes the five leaves read clearly on the wall. If one leaf curls, pin only the curved area again instead of stretching the whole motif.
Prepare the Branch and Hanger
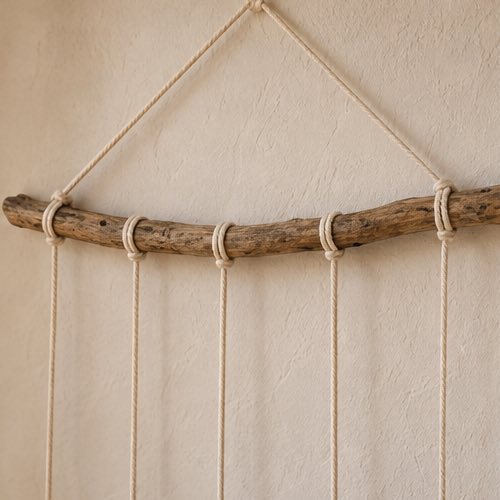
Wipe the branch clean and check that it is dry. Tie one length of cord near each end, then knot the two ends together above the branch to make a triangular hanger. Hold it against the wall before adding the leaves. Adjust the knot until the branch sits level; it is much easier to fix now than after the leaves are attached.
For a more finished look, wrap each knot around the branch twice before tightening it. You can slide one wooden bead onto each leaf cord later, but keep the branch itself simple so the crochet remains the focal point.
Assemble the Wall Hanging
Cut five hanging cords in staggered lengths: 9, 11, 13, 11, and 9 inches works well for a five-leaf display. Fold the first cord in half, place the loop over the branch, pull the ends through the loop, and tighten gently. Repeat across the branch, leaving about 3 inches between cords.
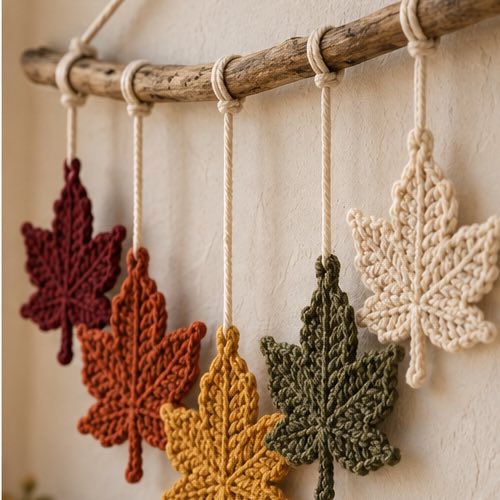
Thread the two ends of each cord through the top of a leaf with a yarn needle, then tie a small knot behind the leaf. Keep the center leaf lowest and let the outer leaves sit a little higher. This creates a calm curved line instead of a straight row. For another autumn display idea, pair it with a crochet fall wreath near your front door.
Customize Your Display
Make the hanging wider by using seven leaves and adding 2 inches of spacing between cords. For a softer palette, use oat, camel, sage, and dusty rose. For a bolder autumn look, use deep wine, orange, gold, and dark green. You can also add a small tassel below the center leaf, but keep it short enough that it does not compete with the leaf points.
If you want matching table decor, make one leaf in the same colors and use it beside a mug or candle. The crochet fall coasters article is a useful companion project for that setup.
Troubleshooting
My branch tilts to one side
Move the hanging knot a little toward the heavier side, then test it again before changing the leaves. A level branch is usually a hanger adjustment, not a leaf-placement problem.
The leaves look uneven
Re-block the leaf that is curling or smaller. Check that the cord enters each leaf at the same point near the top; uneven attachment points can make matching leaves appear different.
The cords slide along the branch
Wrap the cord around the branch twice before tying the leaf on, or secure the loop with a tiny drop of clear fabric glue on the back of the branch once you are happy with the layout.
Care and Storage
Before you hang the piece permanently, place it against the wall at the height where people first see it from the doorway. A branch that looks balanced on a table can look too high or too narrow once it is on a wall. Step back a few feet and check whether the center leaf has enough space below the branch and whether the outer leaves point inward rather than away from the display. Small cord adjustments make a noticeable difference. If your leaves are different sizes, place the largest one in the center and put the smallest ones near the ends. This creates a deliberate rhythm without asking every motif to be identical.
For a family project, let each person make one leaf in a color they choose, then use the shared branch as a seasonal keepsake. You can change the leaves year after year without replacing the hanger: untie the cords, store the leaf motifs flat, and thread new colors onto the same branch next fall. That makes the project useful beyond one season and is a simple way to use leftover yarn with a clear purpose.
Store the wall hanging flat or hang it in a dry indoor space between seasons. If dust settles on the leaves, shake the branch gently or use a soft brush rather than pulling at the points. Cotton leaves can be lightly re-blocked after storage if they lose their crisp shape. Keep the project away from direct rain and strong sun, especially when using a natural branch, so the yarn colors and cord stay clean for next autumn.
If you plan to store the wall hanging between autumn seasons, lay it flat inside acid-free tissue or a clean cotton pillowcase rather than folding the leaves sharply. Keep it away from a damp basement, direct sun, and loose pets, because moisture can relax the fibers and sunlight can fade the warm leaf colors. Before hanging it again, give the branch a gentle shake and reshape every leaf with your fingers. A short length of clear thread or a removable wall hook is kinder to the project than a tightly tied knot, especially when you want to change the display later. If a leaf begins to curl after storage, mist the fabric very lightly, pin it back to shape on a towel, and let it dry completely. This little seasonal reset keeps the hanging tidy, bright, and ready to use year after year.
Questions About This Maple Leaf Wall Hanging
Can I use a dowel instead of a branch?
Yes. A smooth wooden dowel gives a cleaner, more modern finish. Choose one that is at least 2 inches wider than the full row of leaves.
How many leaves do I need?
Five leaves work well on a small branch. Use seven or nine leaves for a wider wall, keeping the longest cord in the center.
Can I leave the leaves unblocked?
You can, but light blocking is worth the time. It helps the maple points stay visible and makes the finished hanging look intentional.
Final Thoughts
This crochet maple leaf wall hanging turns a small motif into an easy seasonal statement. Start with five evenly shaped leaves, test the branch balance before tying anything permanently, and let the center leaf hang a little lower than the rest. Save the finished project to Pinterest for your fall making list, or follow Crochet by Season on Facebook for more seasonal crochet ideas.
More Crochet Projects & Guides
Explore more fall crochet patterns for decorations, quick gifts, and cozy projects that carry the same handmade autumn feel.