Crochet heart coasters turn a small amount of cotton into a Valentine gift that can be used on a desk or breakfast table. This version is a single flat layer worked in rows, with a narrow lower point and two shaped upper lobes. There is no raised applique, stuffing, or thick edging beneath the cup. Make one coaster first and test the actual cup before repeating it in coordinating colors.
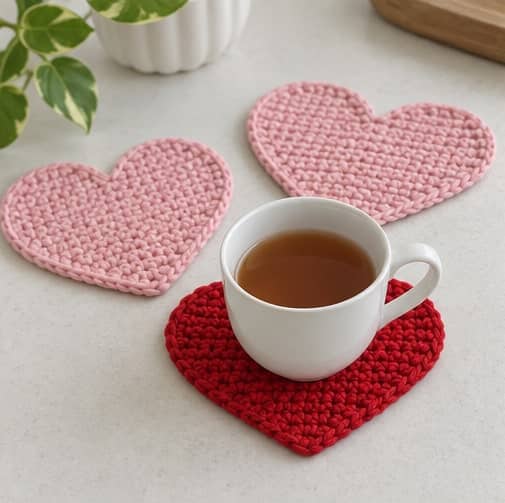
The pattern uses US crochet terms. At the suggested gauge, the heart measures approximately 4¾–5 inches wide and 3¾–4 inches tall. Its widest row contains 24 stitches, and the two lobes are worked separately above that section. Because a heart has a notch and tapered sides, its usable area is smaller than a rectangle with the same dimensions. Check that the cup's entire base rests on fabric rather than hanging over an edge. If you want to make a larger heart-shaped gift next, try the crochet heart pillow pattern; its stuffed construction serves a different purpose from these flat coasters.
Project at a Glance
| Detail | Pattern information |
|---|---|
| Skill level | Confident beginner familiar with simple shaping |
| Terms | US crochet terminology |
| Construction | One flat heart worked from its point toward the lobes |
| Yarn | Smooth cotton, light worsted or a similar weight that meets gauge |
| Hook | 3.5 mm starting point; adjust for a flat, firm fabric |
| Main stitch | Single crochet through both loops |
| Gauge target | 20 sc and 24 rows per 4 inches, washed and relaxed |
| Sample size | Approximately 4¾–5 inches wide and 3¾–4 inches tall |
| Counts | 24 stitches at the widest part; two lobes starting with 12 each |
| Yarn estimate | 15–25 yards per coaster, plus a swatch allowance |
| Finish | Woven tails and gentle shaping, without a raised border |
Materials and Gauge
Choose smooth cotton whose care instructions suit a small washable table accessory. Red and blush pink make a coordinated set, but check colorfastness before washing strong colors beside pale ones. Yarn labels within the same weight category can vary, so compare the actual fabric rather than assuming every cotton will produce an identical coaster. For help comparing fibers and reading yarn labels, see the guide to choosing yarn for beginner crochet; use the weight and gauge specified for this project.
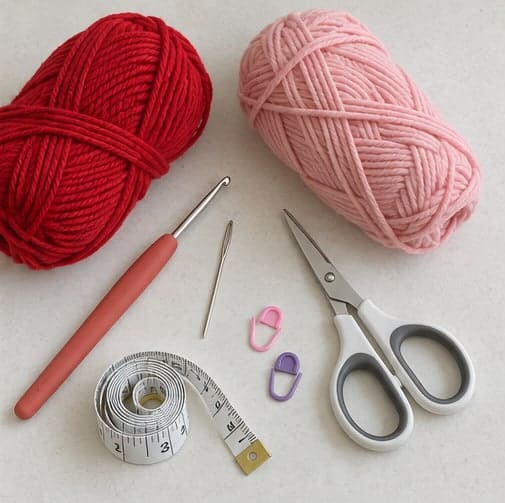
Gather yarn, a hook, blunt tapestry needle, scissors, flexible measuring tape, and removable stitch markers. Keep an empty cup available for testing. If you plan to damp-shape the hearts, use a clean flat surface and rust-resistant pins, following the yarn's care instructions. Remove every pin before the coaster is used or gifted.
Make a swatch with at least 24 stitches and enough rows to measure a central 4-inch area. Wash and dry it as directed. The target is 20 sc and 24 rows per 4 inches, giving five stitches and six rows per inch. Choose a hook that makes a firm but flexible fabric; a stiff board-like piece is not necessary.
If the gauge differs, calculate the likely dimensions before continuing. Twenty-four stitches divided by your stitches per inch gives the widest width. Twenty-three rows divided by your rows per inch gives the approximate height. The finished outline and shaping can affect those measurements slightly, so the first completed coaster remains the best size check.
Abbreviations and Notes
- Ch: chain.
- Sc: single crochet.
- Inc: 2 sc in one stitch.
- Sc2tog: single crochet two stitches together.
- St / sts: stitch / stitches.
- Turning chain: ch 1 before turning; it does not count as a stitch.
Work through both top loops throughout. To make sc2tog, insert the hook into the next stitch and pull up a loop, then do the same in the following stitch. Yarn over and draw through all three loops. This turns two stitches into one and reduces the row count by one. If you need a refresher on the core stitches used here, review basic crochet stitches for beginners before working through the project-specific counts.
The coaster is worked from its bottom point upward. Increases create the tapered lower half, straight rows provide a stable center area, and separate decrease sections shape the lobes. No seam joins the lobes. The photos show the process, while the written counts are the reference for checking your stitches.
Start the Point and Widen the Heart
Chain 3. Row 1: Sc in the second chain from the hook and in the last chain: 2 sc. Leave a tail for weaving later. Do not tie a large knot at the point, where it could make the coaster sit unevenly.
Row 2: Ch 1, turn. Inc in both stitches: 4 sc.
Row 3: Ch 1, turn. Inc in the first stitch, sc in the next 2 stitches, inc in the last stitch: 6 sc.
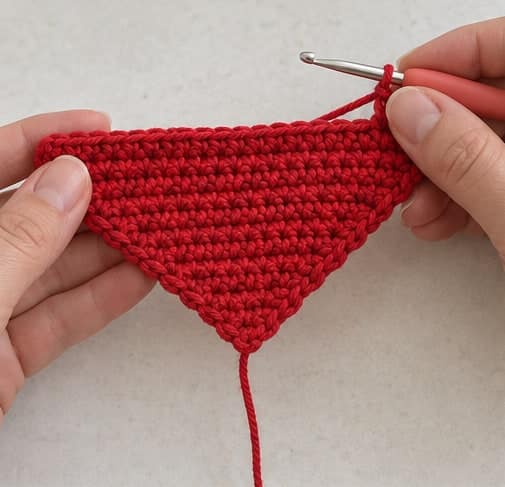
Rows 4–12: Ch 1, turn. Inc in the first stitch, sc across until one stitch remains, and inc in the last stitch. The row totals are 8, 10, 12, 14, 16, 18, 20, 22, and 24 sc. Each new row adds two stitches.
Mark the first and last stitch as you work. A common mistake is putting the final increase into the turning chain rather than the last sc. Check both edges after every few rows. Correct a misplaced increase promptly; an extra edge stitch can distort the flat heart even if the total is corrected later.
Build the Flat Center Area
Rows 13–18: Ch 1, turn. Sc in every stitch across: 24 sc in each row. These six rows contain no shaping. Count Row 18 carefully, then mark the division between stitches 12 and 13.
Lay the work on the table. The lower section should sit flat rather than curl into a bowl. Some light curling can settle after washing, but strong distortion is a reason to check tension and stitch counts now. Do not plan to force a misshapen coaster flat with glue or an extremely hot iron.
The center of the finished heart will provide the main resting area for the cup. Avoid changing this section to bobbles, thick front-post stitches, or raised embroidery without testing stability. A decorative stitch that looks attractive on a hanging motif may be inconvenient beneath a narrow cup base.
Shape the Two Upper Lobes
Row 19, first lobe: Ch 1, turn. Sc in the first 12 stitches only, leaving the other 12 stitches of Row 18 unworked. Turn at the midpoint. The unworked group is reserved for the second lobe, not skipped permanently.
Row 20: Ch 1, turn. Sc2tog, sc in the next 8 stitches, sc2tog: 10 sc.
Row 21: Ch 1, turn. Sc2tog, sc in the next 6 stitches, sc2tog: 8 sc.
Row 22: Ch 1, turn. Sc2tog, sc in the next 4 stitches, sc2tog: 6 sc.
Row 23: Ch 1, turn. Sc2tog, sc in the next 2 stitches, sc2tog: 4 sc. Fasten off with a tail for weaving. Do not gather those final four stitches together.
Join yarn at the outer edge of the remaining 12 stitches of Row 18, working toward the center. Ch 1, then sc across the 12 stitches for the second lobe's Row 19. Repeat Rows 20–23 with the same totals of 10, 8, 6, and 4 stitches. Fasten off.
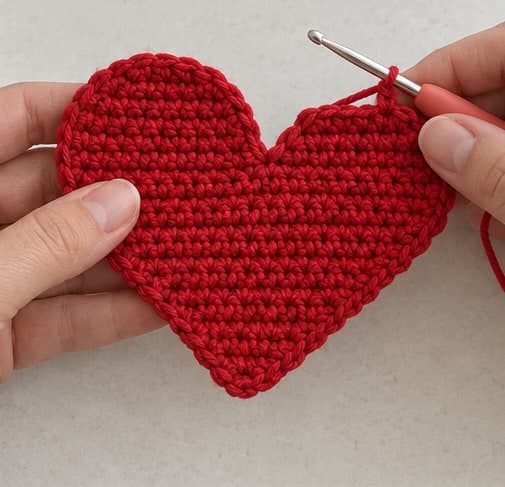
Compare the lobes before finishing. Each should have five rows above Row 18. The notch between them is an intentional dip, with no yarn strand drawn across it. If one side looks taller, count its rows and check whether the joining chain was accidentally worked as a separate stitch.
Secure the Tails Without Adding Bulk
Turn the heart over and weave each tail through the backs of several stitches. Change direction to help secure it, but do not pull hard enough to shorten the edge. Keep the tails within their nearby sections instead of carrying them across the center as loose strands.
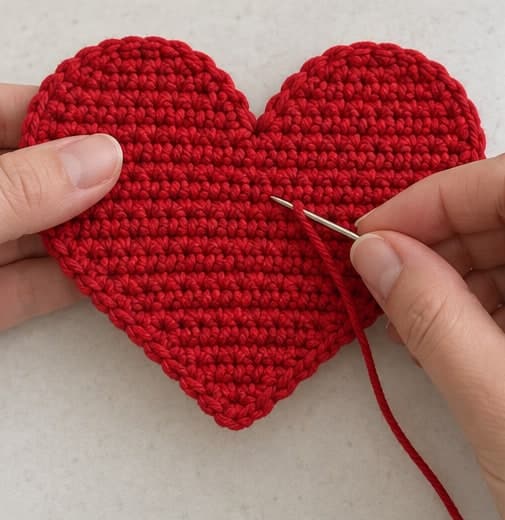
A coaster should not have a knot cluster underneath the cup. Spread the woven tails through different paths and trim only after gently flexing the fabric to check that they stay in place. Inspect both sides for a needle accidentally splitting and pulling a visible strand out of shape.
This version intentionally has no extra edging. A tight slip-stitch border could draw the heart inward, while a bulky scalloped border could interfere with the cup. If you later experiment with an edge treatment, make it on a separate sample and repeat the flatness and stability checks.
Shape and Test the Coaster
Wash or dampen according to the yarn label, then lay the heart flat. Arrange the point, notch, and lobes gently. Use light pinning only if needed, without stretching the piece into a larger size. Let it dry completely before testing it on furniture.
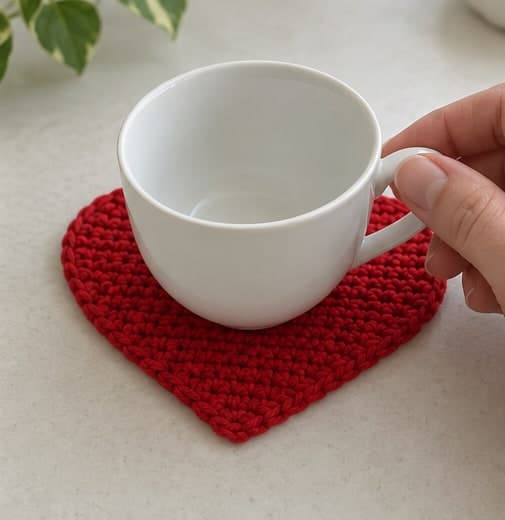
Place the dry coaster on a level surface and set an empty cup centrally on it. Check that the full base sits on the fabric with a margin around the sides. Give the cup a very gentle touch to check for rocking. If it sits partly over the notch or tapered lower area, choose a smaller cup or make a larger sample with suitable yarn and gauge.
This coaster is not a tested heat barrier or a trivet for cookware. Do not use it beneath hot pans or kettles. Crochet fabric is also not waterproof: moisture can reach the table below. Check the surface beneath a damp coaster and follow the furniture manufacturer's care instructions, especially on delicate finishes.
Make a Matching Valentine Set
Finish and test the first coaster before crocheting several more. Record the yarn, hook, relaxed measurements, and the cup used for the check. Compare each new heart with the first after washing. If one is noticeably smaller, investigate tension or yarn differences instead of stretching it forcefully to match.
Alternate red and pink for a simple pair, or use one color throughout. Stripes are possible, but every color change adds tails that must be kept flat. For a quick, tidy set, solid colors are easier to finish. Tie the dry coasters together with a removable ribbon and include a short care note.
Care and Storage
Clean spills promptly according to the yarn label. Dry the coaster fully after washing or use, and reshape without pulling the points. Store the set flat so the lobes do not stay folded. Inspect the woven tails occasionally and repair a loose end before it catches on the cup or table.
If a coaster becomes permanently distorted or develops a thick snag, retire it from cup use until repaired. A decorative heart can still be enjoyed in another way, but table stability should not depend on repeatedly flattening a damaged piece by hand. Carry the heart theme beyond the table with a crochet heart garland for the room.
Troubleshooting
The cup rocks on the coaster
Check for a knot, crossed tail, thick seam-like ridge, or a curled lobe beneath the base. This design has no seam, so the underside should stay fairly even. Reweave bulky tails and reshape the fabric, then test again. Do not keep using an unstable coaster with a filled cup.
The lower point curls upward
The starting chain or first few rows may be tighter than the rest. Compare the fabric with the swatch and check that increases were made at both ends. Gentle washing may settle light curl, but severe tension differences are better corrected by remaking the small piece.
My set has different-size hearts
Compare hook size, row counts, and yarn thickness first. A skipped straight row changes height, while a missed increase changes width. If the counts match, your working tension or yarn may differ. Use the first completed sample as a reference during later pieces, not only at the end.
Quick Project Plan
| Step | What to check |
|---|---|
| Prepare yarn and tools | Swatch washable cotton and choose the intended cup |
| Follow, count, and check | Widen to 24 stitches and shape two equal lobes |
| Finish and review | Weave flat tails, dry fully, and check the cup's complete footprint |
Frequently Asked Questions
Are these two-layer coasters?
No. Each coaster is one flat heart panel. A second layer would change the thickness and could create unevenness if the layers do not match. This version relies on a firm cotton fabric and careful finishing rather than padding.
Will the same coaster fit every mug?
No. The heart outline has less usable area than a round coaster of the same width. Test the actual base, especially for a wide mug. The entire footprint should sit on fabric without reaching over the notch or tapered sides.
Can I add an embroidered name?
Keep any decoration thin and away from the cup's main resting area, then repeat the stability test. Raised letters, beads, and knots can make the base rock. A separate gift label may be a better place for a name than the functional surface.
Should I use acrylic scraps instead of cotton?
The instructions and care approach here are based on cotton. Other fibers change moisture handling, texture, and care requirements. Use a suitable cotton for this version and do not treat any handmade coaster as protection for hot cookware.
How many should I put in a gift set?
A pair suits two everyday cups, while four can serve a small table. Make the number the recipient is likely to use, then test that each piece lies flat. Consistent size and practical care information are more useful than a large stack of mismatched hearts.
Final Thoughts
These crochet heart coasters work best when the finishing stays as simple as the rows: one flat layer, two matching lobes, and no bulky tails under the cup. Use the 24-stitch width as a starting point, check the actual footprint, and finish the first sample before repeating the set. That small test turns a Valentine motif into a more practical handmade gift.
Save red-and-pink table ideas on Crochet by Season's Pinterest page, and share your finished coaster pair on our Facebook page. Keep the washed measurements with your yarn notes so your next set matches the first.