This crochet cupid amigurumi holds a little red heart against a dusty-rose body, with two ivory wings peeking out behind the shoulders. The head, body, limbs, and hair are made separately, which lets you check each small part before sewing. Embroidered closed eyes give the character a gentle expression without adding plastic eye hardware.
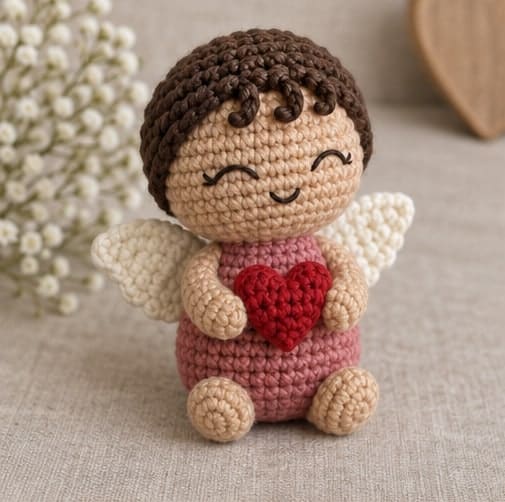
The pattern uses US crochet terms and is written for a small decorative Valentine character, not a safety-tested children's toy. With DK yarn and a 2.75 mm hook as a starting point, expect a figure roughly 4–5 inches tall, depending on tension and assembly. The generated photographs illustrate the intended construction; use the round counts below rather than trying to reproduce every photographed stitch. The design has no wire, bow, arrow, or rigid support. For another small Valentine character, compare this project with the crochet Valentine bee.
Project at a Glance
| Detail | Pattern specification |
|---|---|
| Skill level | Intermediate beginner familiar with amigurumi rounds and sewing |
| Terms | US |
| Main yarn | Smooth DK yarn in skin tone, dusty rose, brown, ivory, and red |
| Hook | Start with 2.75 mm; adjust for close fabric |
| Main stitch | Single crochet in continuous rounds |
| Head | Maximum circumference of 30 stitches |
| Body | Maximum circumference of 24 stitches, ending with a 12-stitch neck |
| Limbs | Two six-stitch arms and two nine-stitch feet |
| Wings | Two flat ovals worked around a short foundation chain |
| Finished height | Approximately 4–5 inches; not a guaranteed size |
| Yarn estimate | Approximately 80–110 yards total across all colors, including tails and practice |
| Filling | Small amounts of fiberfill in the head, body, and feet |
| Features | Embroidered face, sewn hair cap, and a flat heart applique |
Materials and Fabric Check
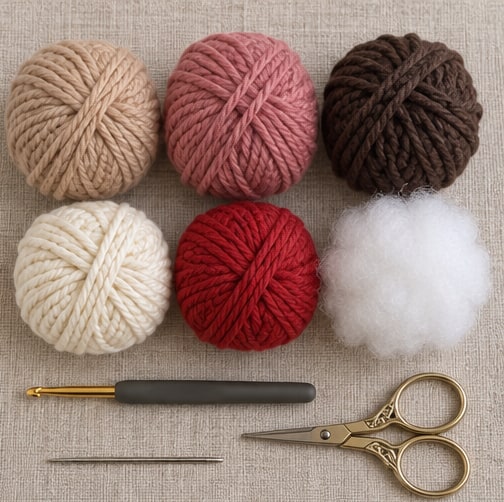
Use yarns of similar thickness for the main parts. A much thicker hair yarn can produce an oversized cap, while finer skin-tone yarn changes the proportions of the head and limbs. Smooth yarn is easier to count than chenille for this small figure. Keep labels so you can follow the most restrictive washing instructions among the materials. For help comparing fibers and reading yarn labels, see the guide to choosing yarn for beginner crochet; use the weight and gauge specified for this project.
- DK yarn in your chosen skin tone and dusty rose for the body.
- Small amounts of brown for hair, ivory for wings, and red for the heart.
- A 2.75 mm hook as a starting size.
- A blunt yarn needle, scissors, removable stitch marker, and clips or temporary placement markers.
- Suitable fiberfill and a little dark embroidery thread for the eyes and mouth.
- Optional finer red yarn and a smaller hook if the first heart is too large for the torso.
For this decorative figure, fabric density matters more than a garment-style gauge. Make the first few head rounds and check that the stitches sit closely together without becoming painful to work. If filling is easily visible through the fabric, try a smaller hook or firmer yarn. Record the hook used so all matching parts remain consistent.
Use small pieces of filling rather than pushing in a single dense lump. The head should be rounded without stretched stitch gaps, and the body should retain a gently oval shape. A very firm head on a softly filled neck area is more likely to tilt after assembly.
Abbreviations and Round Notes
- MR: adjustable or magic ring.
- Sc: single crochet.
- Inc: work 2 sc in the same stitch.
- Dec: single crochet decrease over 2 stitches, producing 1 stitch.
- Ch: chain.
- Hdc: half double crochet.
- Dc: double crochet.
- Tr: treble crochet, beginning with 2 yarn overs.
- Sl st: slip stitch.
Work the head, body, arms, feet, and hair cap in continuous rounds unless stated otherwise. Do not join or turn after every round. Place a marker in the first stitch of each round and move it as you progress. Numbers in parentheses are the completed stitch counts, not additional instructions. If you need a refresher on the core stitches used here, review basic crochet stitches for beginners before working through the project-specific counts.
An invisible single-crochet decrease is useful for the stuffed pieces: insert the hook through the front loop of each of the next two stitches, yarn over and draw through those two loops, then yarn over and draw through the remaining two loops. Keep ordinary stitches through both loops. Close and weave the starting ring tails securely; simply pulling the ring shut is not enough.
Crochet the Head and Body
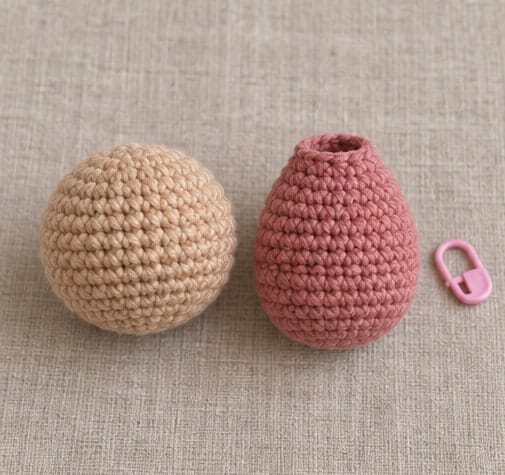
Head in the skin-tone yarn
- Round 1: Work 6 sc in an MR. Close the ring. (6)
- Round 2: Inc in each stitch. (12)
- Round 3: Repeat sc, inc six times. (18)
- Round 4: Repeat 2 sc, inc six times. (24)
- Round 5: Repeat 3 sc, inc six times. (30)
- Rounds 6–10: Sc in each stitch. (30 each round)
- Round 11: Repeat 3 sc, dec six times. (24)
- Round 12: Repeat 2 sc, dec six times. (18)
- Round 13: Repeat sc, dec six times. (12)
- Round 14: Dec six times. (6)
Start filling the head after Round 12 and add a little more before the final round if necessary. Fasten off with a tail, pass it through the front loops of the final six stitches, and draw the opening closed. Secure the end through the inside. The closed decrease end becomes the underside where the body will attach.
Body in dusty rose
- Round 1: Work 6 sc in an MR. (6)
- Round 2: Inc in each stitch. (12)
- Round 3: Repeat sc, inc six times. (18)
- Round 4: Repeat 2 sc, inc six times. (24)
- Rounds 5–9: Sc in each stitch. (24 each round)
- Round 10: Repeat 2 sc, dec six times. (18)
- Round 11: Repeat sc, dec six times. (12)
Fasten off the body with an approximately 18-inch sewing tail and leave the 12-stitch neck opening unclosed. Fill the body evenly, including the shoulder area, while keeping the bottom softly rounded. Do not sew the head on yet: it is easier to position the face and hair while the head can be handled separately.
Make the Arms, Feet, and Wings
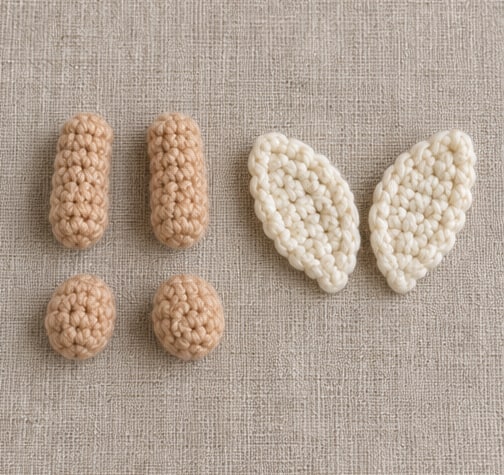
Two arms
Using the skin-tone yarn, work 6 sc in an MR for Round 1. For Rounds 2–6, sc in each stitch, maintaining 6 stitches. Do not stuff the arms. Fasten off with a sewing tail and flatten the opening so the six stitches form three matched pairs. Sew those pairs together to close the upper edge. Make the second arm in exactly the same way.
The arms are short soft tubes, without separate fingers. Check their lengths side by side before attaching them. If one is longer, recount the rounds rather than hiding the difference inside the shoulder seam.
Two feet
In the skin-tone yarn, work 6 sc in an MR for Round 1. Round 2: repeat sc, inc three times to make 9 stitches. Rounds 3–4: sc in each stitch, maintaining 9. Add a tiny amount of filling, then fasten off with a sewing tail. Pass the tail through the front loops of the nine stitches and gather the opening closed. Secure it, leaving the remaining tail for attachment.
Make a second foot and compare the pair. The gathered ends will be sewn against the lower front of the body, leaving the rounded ends visible. These are small decorative feet, not a structure intended to make the figure stand unaided.
Two flat ivory wings
Chain 7. Beginning in the second chain from the hook, work sc, hdc, dc, dc, hdc, then 3 sc in the final chain. Rotate the foundation so you can work into the unused side of the chain. Work hdc, dc, dc, hdc, then sc into the unused side of the chain that held the first sc. Sl st to the first sc to close the oval. There are 13 stitches around the oval, excluding the closing slip stitch.
Fasten off with a sewing tail and make a second wing. These are plain little leaf-shaped ovals, not elaborate feathered wings. Smooth them gently so they lie flat. Keep the narrower starting ends available for sewing to the back of the body; the rounded ends will angle outward and slightly upward.
Add the Hair and Embroidered Face
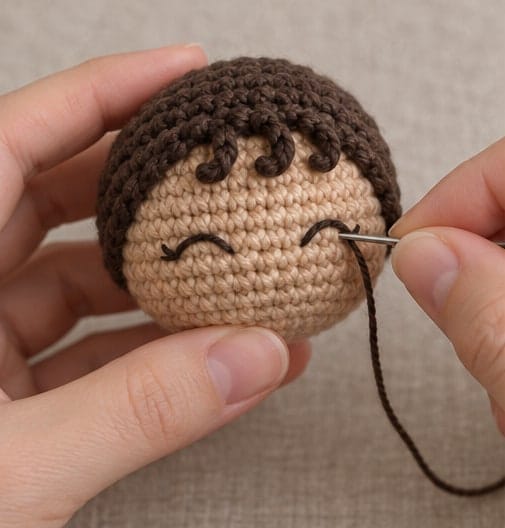
For the brown hair cap, work Rounds 1–5 exactly as for the head, increasing from 6 to 30 stitches. Work Rounds 6–7 with 30 sc in each round. Try the cap over the top of the head before fastening off. The cap should cover the crown without hiding the area where the eyes will be embroidered. Different yarn thicknesses may require adjusting the number of plain rounds.
For a small loop fringe, continue at the front edge of the cap: ch 4 and sl st into the next cap-edge stitch. Repeat this sequence five times, advancing one stitch along the edge for each loop. Fasten off with a sewing tail. Lay the loops along the forehead rather than leaving them as long hanging strands. They are small decorative curves, not a full head of loose hair.
Position the cap and hold it with clips while deciding where the face belongs. A starting placement for the eyes is around head Round 8, with approximately five stitches between their inner ends. Use a contrasting scrap of yarn to test spacing before committing. Check the face from directly in front, not only from above the worktable.
Embroider two short curved closed eyes and a small smile one or two rounds lower. Use shallow stitches and avoid pulling the head inward. Secure thread ends within the head without leaving exposed knots. Then sew the hair cap around its lower edge, keeping the fringe loops free to show their shape while securing their bases.
If the face looks uneven, adjust it now while the head is separate. Slight changes in eye spacing can alter the expression considerably. Do not add plastic eyes or glued features as a quick correction; this version is designed around embroidery.
Assemble Cupid and Add the Heart
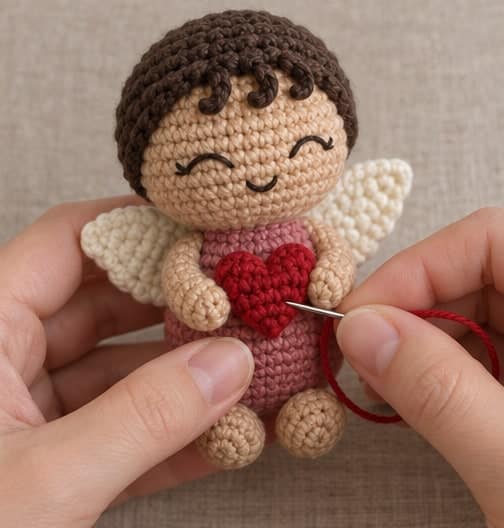
Center the body's 12-stitch neck opening against the closed underside of the head. Check that the face looks forward and the head is not tilted. Use the body's long tail to sew around the complete neck opening, catching sturdy stitches on the head. Work a second careful pass if needed, distributing tension instead of tightening a few stitches into a hard knot.
Attach the arms just below the neck at the sides of the body, with their closed ends forming the shoulders. Angle the lower ends toward the front where the heart will sit. Sew both feet to the lower front of the body at the same height, with the rounded portions projecting slightly. Support the figure on the table while checking the arrangement; do not expect it to balance upright independently.
Sew the narrow end of each ivory wing onto the upper back, one on either side of the center. Keep the wings clear of the head seam and angle them symmetrically outward. Stitch along a short section of each wing base rather than hanging it from one point, so the wings do not rotate freely.
For the red heart, make an MR. Into the ring work ch 3, 3 tr, 3 dc, ch 1, 1 tr, ch 1, 3 dc, 3 tr, ch 3, and sl st into the ring. Fasten off with a sewing tail, close the ring, and secure the starting tail. There are 13 tall stitches, with the chain sections shaping the top and lower point.
Check the heart against the torso. It should sit between the arms without covering the entire body or reaching the face. If it is too large, remake it with finer yarn and a smaller hook. Sew the heart directly to the front of the body, then tack the arm ends near its sides. The heart should be attached securely in its own right, not held only by the arms.
Final Assembly Checks
Inspect the character from front, back, and both sides. Look for uneven feet, a tilted hairline, or a wing base that lifts away from the body. Give every sewn join a gentle inspection, but do not treat this as product safety testing. Hide all tails securely and remove every temporary marker, clip, or pin before displaying the figure.
Use the character as a Valentine shelf decoration or as part of an adult gift presentation. It is not a tested baby toy, and embroidered features alone do not make a handmade object suitable for all ages. Keep loose fibers and small decorative components away from young children and pets. If you enjoy making seasonal figures, a crochet Valentine gnome is another project to plan after Cupid.
Troubleshooting
The head leans backward
Check that the neck opening is centered beneath the head rather than sewn too far forward. The body also needs even filling near the shoulders. Unpick and reposition an off-center seam instead of hiding the tilt with extra hair or a support wire.
The wings curl tightly
Recheck the foundation sequence and confirm that three sc were worked into the far end chain before returning along the unused side. Gently shape a slight curl according to the yarn's care instructions. A badly cupped oval should be remade with more even tension rather than stretched aggressively.
The heart overwhelms the body
Use a finer yarn for the heart and a correspondingly smaller hook. The heart is a separate motif, so resizing it does not require changing the body rounds. Keep it comfortably below the chin and above the feet.
Quick Project Plan
| Step | Work | Checkpoint |
|---|---|---|
| 1 | Crochet and fill head and body | Head reaches 30 stitches; body reaches 24 |
| 2 | Make paired arms, feet, and wings | Both pieces in each pair match |
| 3 | Fit hair and embroider the face | Expression is level before head attachment |
| 4 | Sew head, limbs, wings, and heart | Joins are secure and all temporary markers removed |
Frequently Asked Questions
Do I join the amigurumi rounds with a slip stitch?
No. The head, body, limbs, and hair cap use continuous rounds, with a marker identifying the first stitch. The wing oval and heart motif have their own closing slip-stitch instructions. Mixing joined and continuous rounds changes the appearance and can confuse the count.
Why is the head closed but the body neck left open?
The closed head gives you a defined underside to position over the body's 12-stitch opening. You sew around that opening to form the neck join. Closing the body first would remove the attachment edge used by these instructions.
Can I omit the hair fringe?
Yes. Finish the cap after its plain rounds for a simpler hairstyle, then sew it in place. Keep the cap's position consistent with the embroidered eyes rather than moving it down to cover a mistake in the face.
Will Cupid stand on its own?
The rounded body and small feet are intended for a supported or seated display, not reliable freestanding balance. Do not add wire or heavy objects to the filling to force it upright. A shelf arrangement with gentle support is a better match for this construction.
Has this been tested as a child's toy?
No. These are instructions for a decorative crochet character, not a claim of compliance with toy-safety requirements. If you intend to sell or give handmade toys to children, you need to address the applicable safety requirements separately; changing the eyes to embroidery is only one design choice.
Final Thoughts
Cupid's character comes from the small finishing decisions: a level smile, matching wings, and a heart that fits naturally between the arms. Count each round as you go, compare paired pieces before sewing, and take time to center the neck seam. Keep the finished figure as a decorative Valentine keepsake with its soft parts securely attached.
Save your character's color palette with Crochet by Season on Pinterest, or show the little embroidered expression you chose on Crochet by Season on Facebook.