A crochet heart pillow can be made from two flat panels rather than a complicated three-dimensional shape. This small decorative cushion starts at the bottom point, widens through simple increases, and divides into two short upper lobes. Sew the matching panels together and add a modest amount of filling. Coral yarn keeps the heart bright without needing a face, buttons, or other attached decorations.
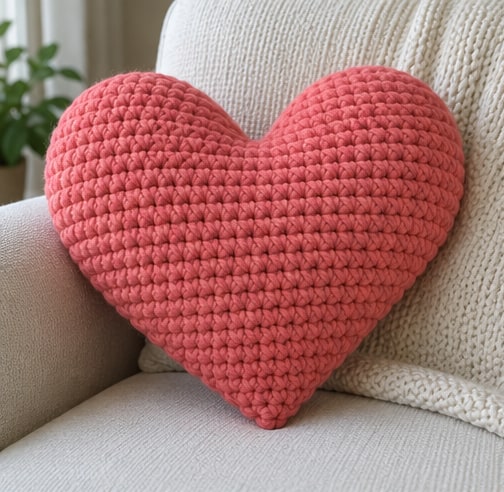
The instructions use US crochet terms. At the suggested gauge, each unstuffed panel is approximately 9½ inches wide and 7½–8 inches tall. Filling gives the finished cushion depth and can reduce its apparent width slightly. This is a small decorative Valentine cushion, not a standard pillow insert cover or a tested children's toy. Make the two panels with the same yarn and hook so their edges match during assembly. For smaller projects to include with the pillow, browse these Valentine crochet patterns.
Project at a Glance
| Detail | Pattern information |
|---|---|
| Skill level | Confident beginner familiar with increases and decreases |
| Terms | US crochet terminology |
| Construction | Two flat heart panels sewn together and lightly filled |
| Yarn | Smooth bulky-weight yarn suitable for a dense fabric |
| Hook | 6.5 mm starting point; adjust after swatching |
| Main stitch | Single crochet through both loops |
| Gauge target | 10 sc and 12 rows per 4 inches, relaxed |
| Panel width | 24 stitches at the widest part, approximately 9½ inches |
| Panel height | 23 rows from point to top of each lobe, approximately 7½–8 inches |
| Yarn estimate | 120–180 yards including swatching and sewing allowance |
| Filling | Small amounts of washable polyester fiberfill, added gradually |
| Finish | Matching-yarn seam with no separate embellishments |
Materials and Gauge
Choose a smooth plied yarn that lets you identify the first and last stitch of every row. Very fuzzy yarn can hide shaping mistakes, and loosely spun fibers may be less convenient for repeated sewing passes. A soft bulky yarn is a starting choice, but check that your hook produces a fabric dense enough to contain the filling without becoming rigid. For help comparing fibers and reading yarn labels, see the guide to choosing yarn for beginner crochet; use the weight and gauge specified for this project.
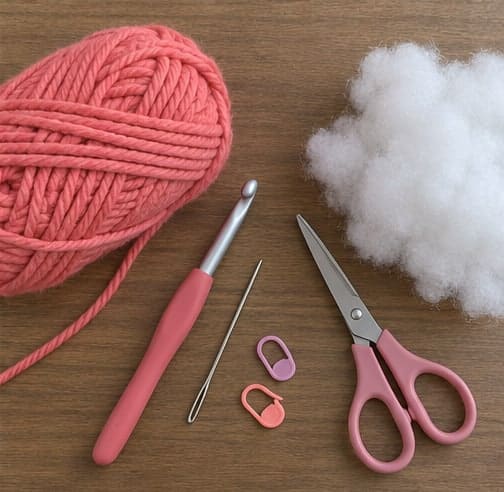
Gather a hook, blunt tapestry needle, scissors, flexible measuring tape, and several removable stitch markers. Use clean fiberfill intended for washable craft projects and keep its packaging for care information. The amount needed depends on how firmly you fill the cushion; add it by feel rather than treating a particular weight as a required target.
For a gauge swatch, chain 17 and work 16 sc across each row, using chain one to turn without counting it as a stitch. Make at least 16 rows. Wash and dry according to the yarn label, then measure a central 4-inch area. Aim for 10 stitches and 12 rows. The fabric should bend comfortably while its gaps remain small when gently spread.
If the swatch is too open, test a smaller hook, accepting that the pillow will become smaller unless you redesign its shaping. If it is stiff or hard to crochet, try a slightly larger hook and recheck the gaps. The stated counts remain the same throughout this pattern; do not add random stitches to compensate for a different gauge.
Abbreviations and Shaping Notes
- Ch: chain.
- Sc: single crochet.
- Inc: work 2 sc in one stitch.
- Sc2tog: single crochet two stitches together, reducing two stitches to one.
- St / sts: stitch / stitches.
- Turning chain: ch 1 before turning; it does not count as a stitch.
To work sc2tog, insert the hook into the next stitch and pull up a loop, then repeat in the following stitch. Yarn over and draw through all three loops on the hook. Each sc2tog reduces the row count by one. Work through both top loops for the ordinary stitches and for these decreases. If you need a refresher on the core stitches used here, review basic crochet stitches for beginners before working through the project-specific counts.
The heart is worked from its lower point upward. Increasing at both ends adds two stitches per row until you reach 24. Six straight rows create the full-width section. Each upper lobe then uses only 12 of those stitches, decreasing symmetrically to 4. Make two panels with exactly the same sequence; the images illustrate the stages rather than providing a stitch-count chart.
Crochet the Lower Point
Chain 3. Row 1: Sc in the second chain from the hook and in the last chain: 2 sc. The two-stitch start makes a small blunt point rather than a single fragile stitch.
Row 2: Ch 1, turn. Inc in each stitch: 4 sc. Mark the first and last stitch so you can find the increase positions in subsequent rows.
Row 3: Ch 1, turn. Inc in the first stitch, sc in the next 2 stitches, inc in the last stitch: 6 sc.
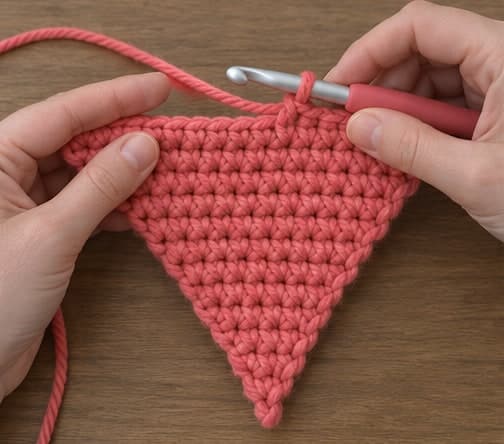
Rows 4–12: Ch 1, turn. Inc in the first stitch, sc in every stitch until one remains, then inc in the last stitch. The row totals are 8, 10, 12, 14, 16, 18, 20, 22, and 24 sc respectively. Move the end markers after every row and count before continuing.
Keep the increases inside the actual first and last stitches, not the turning chain. Lay the widening section flat periodically. Both sloping sides should grow at a similar rate. If one side has an extra step, locate the first incorrect row rather than adding a compensating increase on the other side later.
Work the Full-Width Section
Rows 13–18: Ch 1, turn. Sc in each stitch across: 24 sc in every row. There are no increases or decreases in these six rows. Mark the end of Row 18 because both lobes begin above it.
Measure the panel across this widest section without stretching it. At 2½ stitches per inch, 24 stitches span approximately 9.6 inches. Small differences are acceptable for a decorative cushion, provided the two panels match. A large difference between panels is worth correcting before sewing.
Count Row 18 carefully and divide it into two groups of 12 stitches. Place a marker between the groups, or mark stitch 12 and stitch 13 with different markers. The first lobe uses the first group you encounter after turning. Do not skip a center stitch or add an extra chain across the future notch.
Shape the First Upper Lobe
Row 19: Ch 1, turn. Sc in the first 12 stitches only: 12 sc. Leave the remaining 12 stitches unworked for the second lobe. Turn at this midpoint rather than continuing across the full heart.
Row 20: Ch 1, turn. Sc2tog, sc in the next 8 stitches, sc2tog: 10 sc.
Row 21: Ch 1, turn. Sc2tog, sc in the next 6 stitches, sc2tog: 8 sc.
Row 22: Ch 1, turn. Sc2tog, sc in the next 4 stitches, sc2tog: 6 sc.
Row 23: Ch 1, turn. Sc2tog, sc in the next 2 stitches, sc2tog: 4 sc. Fasten off, leaving a tail long enough to weave securely. The short four-stitch top softens further when the cushion is filled; do not pull it into a tight gathered knot.
Complete the Second Lobe and Panel
Return to the 12 unworked stitches of Row 18. Join yarn at the outer edge of that group, then work toward the center so the second lobe mirrors the first. Ch 1 and sc across those 12 stitches for its Row 19. Do not count the joining chain as an extra stitch.
Repeat Rows 20–23 exactly as for the first lobe: 10, 8, 6, and finally 4 stitches. Fasten off. Both lobes should have five rows above Row 18 and the same top count. The center notch is the division between them; no separate cut or sewn dart is needed.
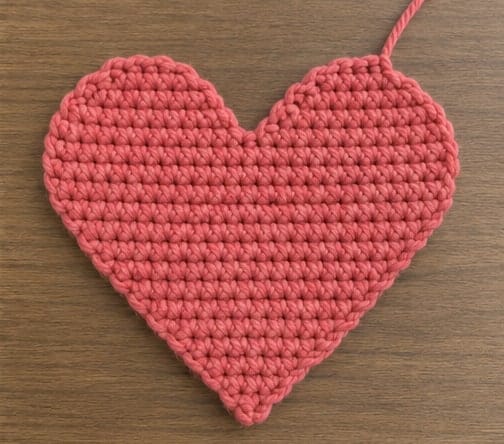
Weave in the short construction tails on the reverse side without tightening the edges. If the panel curls, gently wash and shape it according to the yarn label, then dry flat. Do not stretch one lobe larger to hide a count error. Make the second panel by repeating the complete instructions from the two-stitch point.
Match and Sew the Two Panels
Place the panels together with their preferred outer faces visible. Match the bottom points, center notches, lobe tops, and widest corners with removable markers. Compare the corresponding row ends between those checkpoints. A consistent pair of panels should align without stretching one around the other.
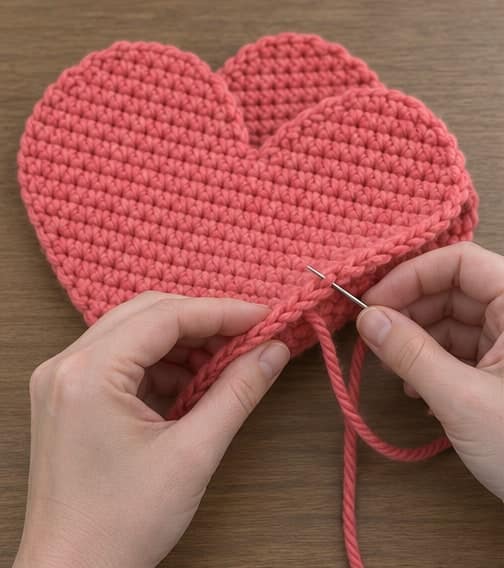
Thread a manageable length of matching yarn and begin along one lower side, leaving a tail for securing. Whipstitch the matched edges, catching strong corresponding loops from both panels. Along row ends, take evenly spaced passes rather than forcing a fixed stitch into every visible gap. Keep the seam snug but flexible, without drawing the edge into a cord.
Work around the bottom point, the opposite side, both lobes, and the center notch. At the notch, take small secure passes that preserve the inward dip without bridging across it. Stop with an opening of roughly 2–3 inches on the remaining side for filling. Do not close the entire perimeter before testing the shape.
Add Filling and Close the Opening
Pull small tufts from the fiberfill and place them first in the lower point and upper lobes. Use your fingers or a blunt tool to distribute them gently; do not use sharp scissors to push filling into a corner. Add more through the middle until the cushion feels softly supported rather than tightly packed.
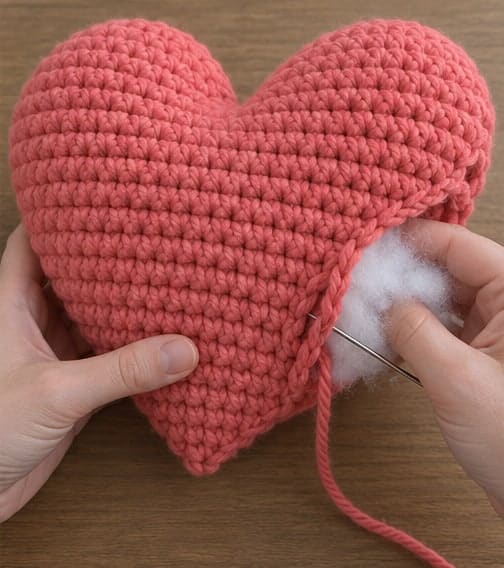
Pause and look at the front. Overfilling can flatten the center notch, exaggerate stitch holes, and turn the heart into a rounder shape. Remove a little filling if the seams strain or the yarn stretches apart. The two lobes should have similar fullness, while the bottom point should remain recognizable rather than hard.
Close the remaining seam with the same spacing and tension as the rest. Secure the sewing yarn, pass the tail through several stitches on the inside, and bury the end within the cushion before trimming. Gently squeeze the pillow to check that the opening stays closed and no fiberfill emerges between the stitches.
Finish and Care for the Gift
Smooth the filling by gently patting the cushion on a flat surface. Inspect the notch and both lobe tops for loose tails, skipped seam sections, or unusually tight stitches. If something needs correction, reopen the relevant seam section and repair it rather than pulling the outside into shape with extra knots.
Follow the care instructions that suit both the yarn and filling. Dry the cushion thoroughly after any permitted washing; a dry outer surface does not guarantee that the center is dry. Include fiber and care information with the gift. Keep this decorative cushion out of infant sleep spaces and do not present it as a safety-tested toy.
Customize Without Losing the Shape
Make the front and back in different colors while keeping the yarn weight and gauge the same. Compare the panels after washing, since two yarns labeled bulky can still produce different dimensions. A contrast seam is another option, but it makes uneven stitch spacing more visible, so test a small section before committing.
To change size without rewriting the shaping, use a different yarn and suitable hook together, then calculate the approximate width from 24 stitches at your new gauge. Check fabric density and make both panels identically. Enlarging only the straight section makes the heart taller; it does not scale the lobes or width proportionally. If you prefer a flat heart motif for your next project, try a crochet heart granny square.
Troubleshooting
One upper lobe is taller than the other
Count the rows above Row 18. Each lobe needs one 12-stitch row and four decrease rows. Check whether the yarn join accidentally became an extra row. Correct the shorter or longer lobe before assembly rather than pulling the seam to equalize it.
The center notch disappears after stuffing
Remove some filling from the upper middle and inspect the seam at the dip. The seam must follow the inward corner instead of spanning across it. Rework that short section if necessary, keeping the shape clear without cinching a hard knot into the center.
White filling shows through the stitches
First reduce overstuffing. If the relaxed fabric still has large gaps, the gauge is too open for this use. Make denser panels with an appropriate yarn and hook, or use a properly sewn inner fabric lining if you have the sewing skills to make one that fits. Do not rely on stretching the outer yarn over more filling.
Quick Project Plan
| Step | What to check |
|---|---|
| Prepare yarn and tools | Make a dense swatch and choose compatible filling |
| Follow, count, and check | Increase from 2 to 24 stitches, then shape two equal lobes |
| Finish and review | Match panels, fill lightly, and close every seam securely |
Frequently Asked Questions
Is there a separate heart-shaped insert inside?
No. This version is filled directly with craft fiberfill after the two crocheted panels are joined. If you prefer a removable insert, that requires a separate sewn lining and a redesigned opening; it is not included in this closed-seam version.
Do I need to reverse the pattern for the back panel?
No. Make both panels from the same instructions, then choose which faces you want on the outside. The shaping is symmetrical. Match the key points and corresponding row ends before sewing to confirm that the panels are the same size.
Why do the lobes finish with four stitches rather than one?
A one-stitch finish would create sharp peaks. The four-stitch top gives a broader upper edge that softens when lightly filled. The result is a gently shaped handmade heart rather than a tightly pointed star-like outline.
Can I add a name to the front?
Yes, simple surface embroidery can be added to the flat panel before assembly. Keep it flexible and avoid loose strands that could catch. Recheck that the embroidery has not pulled the panel smaller than its partner before sewing the two together.
How firm should the finished pillow feel?
It should hold its shape while yielding under light pressure. Stop adding filling before the stitch gaps open or the seam strains. This is a decorative cushion, so preserving the heart silhouette and a secure seam matters more than achieving a very firm fill.
Final Thoughts
The heart shape depends on matching counts more than elaborate stitches: two panels widen to 24 stitches, then each divides into two 12-stitch lobes that decrease to 4. Compare those panels before sewing and add the filling a little at a time. A clear center notch and relaxed seams give this crochet heart pillow its soft Valentine finish.
Save your favorite coral, pink, and red combinations on Crochet by Season on Pinterest, or share your two-color pillow on our Facebook page. Keep the yarn label and gauge notes with your pattern so a matching cushion is easier to make later.